The Inventory Purchasing Page is a powerful tool for purchasing inventory, creating purchase orders, and managing inventory stock levels. The Inventory Purchasing feature can also be used to list a number of inventory items, making the task of changing inventory information a bit easier. The Purchasing page is especially useful when inventory counts are tracked, and purchase orders are used in the purchasing process. The user can also use this page to create manufacturing batches instead of purchase orders.
To open the page, go to Inventory > Purchasing. The purchasing window consists of 2 tabs:
-
The Purchasing tab is used to purchase stock items. See details below:
-
The Special Orders tab is used to purchase special order items. Review Special Orders and Drop Shipped Items > Purchasing Special Orders for steps to purchase special order or drop shipped products.
Go to the Purchasing tab to see this view. Unlike many other lists within EBMS, the Find (F5) button must be clicked to show items on the purchasing list.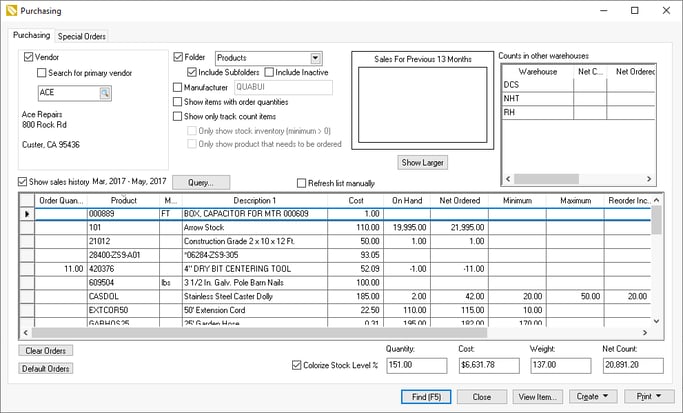
Query by Vendor
Check the Vendor checkbox to find and select a specific vendor. The user has the option of displaying all inventory items or only the items purchased from a specific vendor.
Enable the Search for primary vendor option to increase the list load speed for the specified vendor if items are purchased from a single vendor. This switch will only query vendors which are listed as primary vendor within the product record Purchasing tab.
Click on the Find (F5) button or press the F5 key on the keyboard to populate the table.
An internal manufacturing vendor setting should be set as the Primary Vendor if the product is manufactured instead of purchased. Review Manufacturing Vendor for setup details.
Query including Category
If the list of inventory items is too lengthy to properly evaluate, then query the list using the options of the upper right side of the purchasing window. The available options are:
-
Check the Folder checkbox to limit the list to a specific inventory folder. Select the desired folder by clicking on the down arrow to the right of the folder field. The folder field cannot be set unless the Folder switch is turned ON. To include all inventory items within the subfolders as well, click the Include Subfolders switch ON.
-
Turn on the Show items with order quantities if you wish to list only the items that you have selected to purchase. The first column of the inventory list is labeled Order Quantity. This quantity can be edited to determine the amount of each item that you wish to purchase. If you check the Show items with order quantities switch, only the items with an Order Quantity that is not zero will be displayed.
-
The Query button can be used in conjunction with the options listed above. The Query window functions the same as the query options found within search lists and reports. This query can be used to query based on warehouse or the inventory purchasing tab data. Review Set Query Options for query setup instructions.
PERFORMANCE NOTE: Disable the Refresh list manually option if the reloading of the list is slow when exiting the View Item dialog.
Displaying Helpful Column Data
The inventory purchasing window allows a number of optional columns to be displayed or hidden. Right-click on any column label to display all the available columns. To hide the columns, click on the heading label to remove the check mark or show columns by clicking on the column to switch the check mark ON. All information displayed can be viewed within the Inventory > Product Catalog window. Each available column is listed below with a brief description:
-
The Order Quantity will appear blank until the user enters the desired order amount. This information is saved even when the item is not displayed on the window.
-
The Product column identifies the inventory item and Description 1, Description 2, and Description 3 describe the inventory item as entered within the General tab.
-
The Type field can be very useful when querying information in user-defined groups. For example, if the user prefers a user-defined list of items that are used on a regular basis to manufacture some common products, the user can insert a code such as MFG within the Type field. The new code can be separated from other existing codes within the Type field by a comma or space (LARGE, MFG). To list all the items that contain the MFG code within the Type field, click on the Query button on the upper part of the purchasing window and enter the following information. Database = "TYPE", Operator = "Contains", Value = "MFG". For more instructions on the query function, review Set Query Options.
-
The last Cost value reflects the most recent purchase cost of the item and is stored within the product record Pricing tab.
-
An optional column labeled Sales Level is used to sort high selling items from less popular items. Review the Sales Level Classification for more details on this optional feature.
-
The Weight column is an optional field used to record the weight of an item for shipping purposes. The item's weight is stored within the Gross Weight field within the product record General tab.
-
The Base Price column can be shown to allow the purchaser to visually review each inventory item's base price.
A number of the following count columns that are located within the Count tab of the Product Catalog screen can also be displayed.
-
The Count amount is the total processed inventory on hand. The Count amount is incremented when a purchase order is processed into an invoice. As long as an item is not processed (Purchase Order), the Count is not affected. The Count amount is decreased when a sales order is processed into a sales invoice.
-
The Purchase Orders and Purchase Orders Shipped fields reflect the amount that is currently on purchase orders. When an expense invoice is processed, the Purchase Order amounts are decreased, and the Count total is increased.
-
The Sales Orders and Sales Orders Shipped fields record the total amount that are currently on sales orders. If an invoice is saved but not processed (Sales Order), the Sales Orders amount is increased. The Sales Orders Shipped amount reflects the total amount recorded in the Shipped column of the sales order or invoice. When the sales invoice is processed, the Purchase Orders and Purchase Orders Shipped amounts are decreased and the Count total is increased.
-
The On Hand column displays the total amount of inventories that are in stock. [On Hand = Count + Purchase Orders Shipped - Sales Orders Shipped] This column differs from the Count column since it reflects invoices that have not been processed.
-
The Net Ordered column displays the inventory count considering all purchase and sales orders. [Net Ordered = Count + Purchase Orders - Sales Orders] This column differs from the On Hand column since it reflects all order amounts rather than only the counts listed within the Shipped column that are in the invoices that have not been processed.
-
The Minimum and Maximum fields are used to automatically order when the On Hand is less than the Minimum amount. The recommended order is in increments of the Order Amount until it reaches the Maximum inventory. See the section below that describes the Default Orders button for more details on how these fields can be used.
-
The Sales History column can be valuable to display the sales count history. (The length of time used to calculate this history is set within the Inventory Purchasing section of the Inventory > Options > General tab as shown below.)
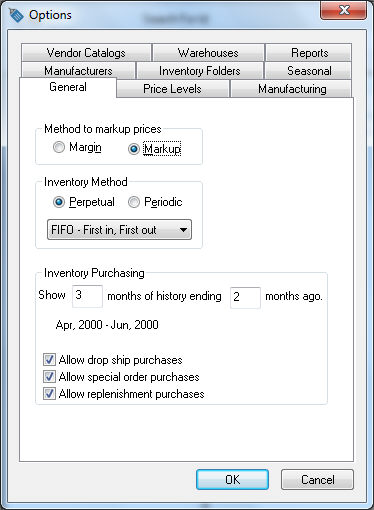
Enter the number of months that are totaled together and displayed in the Sales History column. Example: Enter the number 3 to show the total sales for 3 consecutive months.
Enter the ending month number. It is recommended that this setting have a value. For example, if you enter the number 1, the system will calculate the specified number of months up to and including last month. It is not wise to include the current month since it is not completed.
Example: The user wishes to show the total sales for the past year with a current date of 09-10-2002. Enter 12 in the first Inventory Purchasing month field and the number 1 for the second month. The Sales History within the Purchasing window will show the total sales between September 2001 and August 2002.
Color Code Product
The Calculate Stock Levels option at the bottom of the dialog should be enabled only if colorization is being used. Review Color Coded by Stock Level for details on coloring product based on stock levels.
List Product by Vendor
The Inventory Purchasing page can list only the items listed for a specific Vendor. Enable the Vendor option if you are preparing to create an order for a specific vendor and then enter the vendor's ID as shown below:
An inventory item will be listed under multiple vendors if the same item has been purchased from multiple vendors. All items associated with the selected vendor listed within the product record will be listed. Highlight the desired inventory item, click on the View Item button, and click on the Purchasing tab to view the Primary Vendor setting Item window: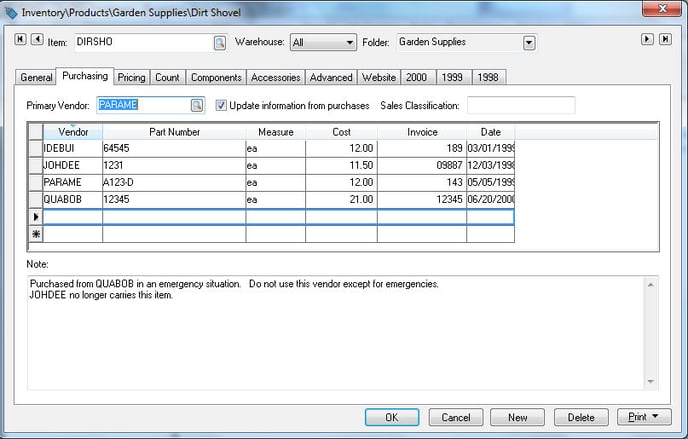
In the example above, the inventory item DIRSHO will be listed when any of the three listed vendors are selected (IDEBUI, JOHDEE, or QUABOB). Delete the record within the Purchasing tab to remove a specific item from a vendor's purchasing list.
A new vendor record will automatically be inserted into the inventory item's vendor list when the inventory item is initially purchased from a vendor. Manually add a new vendor by adding the vendor's ID into the vendor list. The new vendor's quoted price may also be entered in the Cost column. Review Purchasing Tab for more details on the vendor product list within the Purchasing tab.
An internal manufacturing vendor setting should be set as the Primary Vendor if the product is manufactured instead of purchased. Review Manufacturing Vendor for setup details.
Print Stock Levels
An inventory order sheet can also be printed if you wish to have a hard copy of all the items purchased from a specific vendor. To launch this report, go to > Inventory Order Sheet (Vendor).
Restocking Inventory Processes
Use the purchasing page to restock inventory by purchasing or manufacturing product. Review the following for steps to order or manufacture product to increase stock levels:
-
Purchase inventory for stock: Review Using the Purchasing Page to Create Purchase Orders for steps to create purchase orders from the purchasing page.
-
Manufacture inventory for stock: Review Creating a Manufacturing Batch from the Purchasing Page for steps to create a manufacturing batch from the purchasing page.
-
Purchase special orders for stock: Review Special Orders and Drop Shipped Items > Purchasing Special Orders for steps to purchase special order or drop ship product.