A manufacturing batch can be created as a result of low product stock. This process allows the user to manufacture stock inventory using the Purchasing page. The Purchasing page uses the Stock Levels to identify items with low inventory counts. Review the following instructions to create a manufacturing batch based on product category or based on the primary source.
Set Stock Levels
Verify that Stock Level settings are sufficiently populated. Review Stock Level Settings for multiple options to set stock level settings.
Create Batch based on Product Category
Complete the following steps if the manufactured product is grouped by category or folder.
-
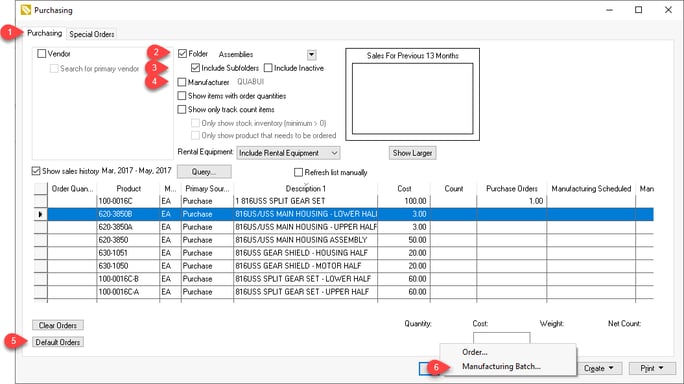
Open the Purchasing page by selecting from the main EBMS menu.
-
Select the Folder or category that contains the manufactured product.
-
Enable the Include Subfolders option if manufactured items are in subfolders to the selected category.
-
Disable the Manufacturer option unless all manufactured items have a common manufacturer setting. Review Manufacturer Setting for more details on this setting only if this setting is enabled.
-
Populate the Order Quantity by clicking on the Default Orders button or manually entering quantity needed to restock based on the stock level settings.
-
Click on the Create button and select the Manufacturing Batch option as shown above.
Create Batch based on Primary Source
The following steps allow the user to create manufacturing batches and purchase orders during the same process. Use the following steps to create a manufacturing batch based on a process manufacturing vendor code within the Inventory > Purchasing > Purchasing tab > Primary Vendor setting:
-
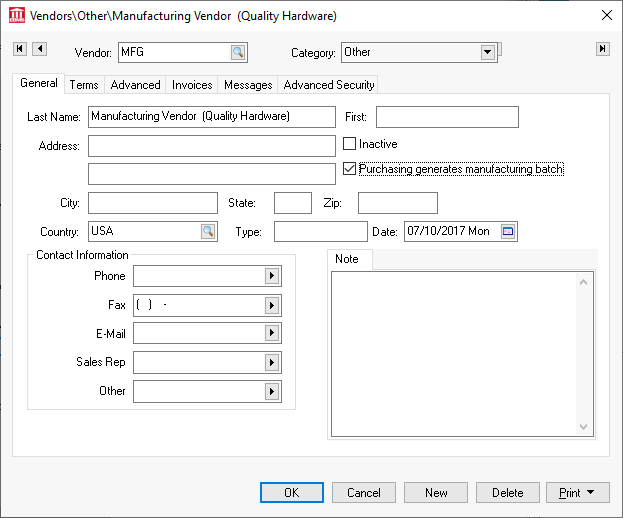
Create a process vendor that is used to identify the manufacturing process instead of an actual vendor. Place the manufacturing process vendor into a category that is marked 'Internal', so it is not confused with actual vendors.
-
Enable the Purchasing generates manufacturing batch option for this vendor only on the vendor record General tab. A manufacturing batch instead of a purchase order is created whenever this vendor is entered as a primary vendor in the purchasing tab of an item.
-
Enter this process vendor as the primary vendor within the purchasing tab of all manufacturing items. Use the filter down option to globally change the Primary Vendor for an entire group of products.
-
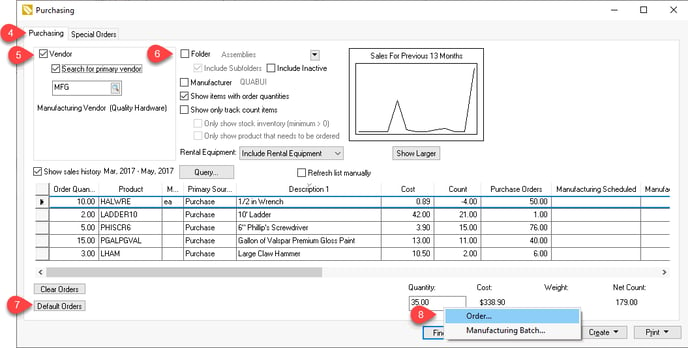
Open the Purchasing page by selecting Inventory > Purchasing > Purchasing Tab from the main EBMS menu.
-
Either enable the Vendor and set the process manufacturing vendor or disable the Vendor option to create both manufacturing batches and purchase orders. Enable Search for primary vendor to limit the purchase options to the Primary Vendor.
-
Set the Purchasing page filters to limit the product list. Review Inventory Purchasing Page for details on various filter and query options.
-
Populate the Order Quantity by clicking on the Default Orders button or manually entering quantity needed to restock based on the stock level settings.
-
Launch the Create Order wizard by selecting Order from the Create button. This process will create both manufacturing batches and purchase orders based on the vendor setting. Review Create Purchase Orders from the Purchasing Page for instructions to complete this order creation wizard to restock inventory.
-
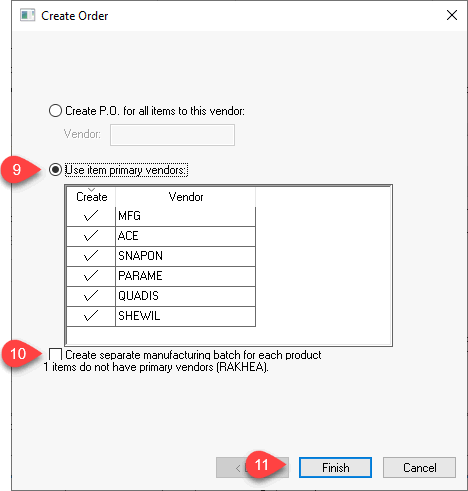
Select Use item primary vendors option to select multiple vendors. Verify that the manufacturing process vendor created in the first step is included on the vendor list.
-
Enable the Create separate manufacturing batch for each product option to create a separate manufacturing batch for each product.
-
Click Finish to create both the manufacturing batch and purchase orders. Review Processing a Batch for steps to process the manufacturing batch. Review Purchase Order Overview for steps to process a newly created purchase order.
Show Manufacturing Columns
Adjust the desired columns within the Purchasing page to show the manufacturing settings. Some suggestions are shown below:
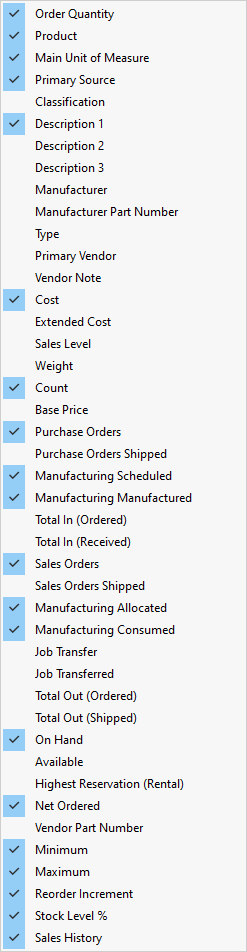
Review Column Appearance for instructions to show or hide columns.