EBMS gives a manager the tools to set customer defaults so that important standard settings are consistently set for each new account. Configuring accounting defaults, setting financial terms, standard messages, and other important configurations can save managers time and make data entry consistent.
It is wise to set customer category defaults before entering new customers. If you are not familiar with editing defaults, review Edit Defaults, Filter Down Data, and Globally Change Data for more details on these important default settings. To continue, perform the following steps:
-
Go to Sales > Options > Customer Categories tab.
-
Click on the root folder named Customers and then click on the Edit Defaults button. The following window will appear:
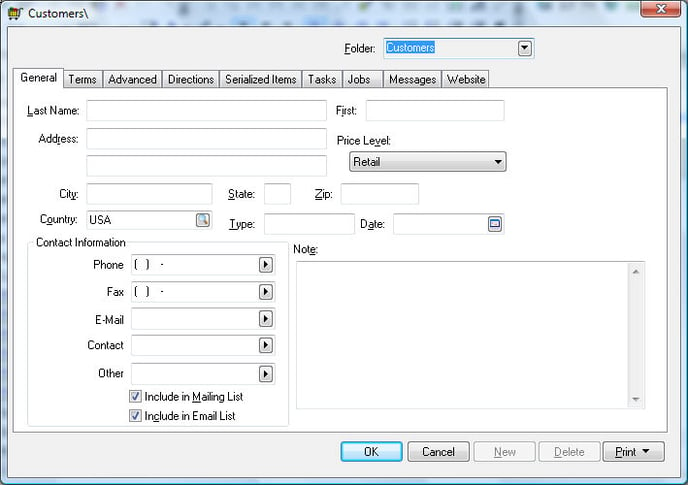
The Customer category window looks very similar to a customer account window, but this page is only used to enter default values. Any data entered into these entry fields on this page will be defaults the next time you enter a new customer in the main customer entry window. For example, if you set the Country field to "USA," you will not need to enter the country when entering a new customer. Only use this page to enter information that will apply to the majority of your customers, because it will be a global change for all new customer accounts.
General Tab
-
Set the Contact Information field labels to reflect the most common contact information obtained from customers. Click on the right arrow button to the right of each of the five entry fields and select a variety of labels.
-
Enable the Include in Mailing List option and/or the Include in Email List if new customers should automatically be added to these lists.
-
Set the Price Level setting to reflect the most common inventory price level used for customers.
-
The remainder of the general tab fields can remain blank.
Terms Tab
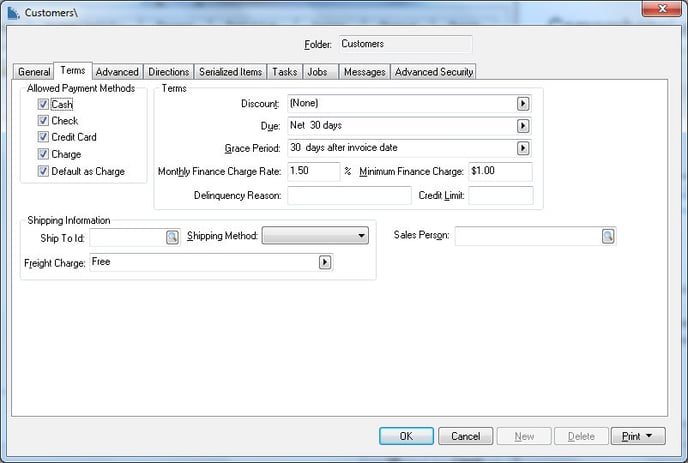
It is important to set up the default Payment Terms fields that are used for new customers. Review the following settings carefully and set the standard terms.
-
The Allowed Payment Method should reflect the standard payment methods accepted for payment from customers. The Cash option should always be enabled. Enable the Check option if the company accepts personal or business checks from most customers. Enable the Credit Card option if credit cards are accepted. Enable the Charge option to give terms to most customers.
These settings are the default settings for new customers, so disable the Charge option if credit checks are required before customers are approved with terms. Enable the Default as Charge option to default the order entry window to charge. Otherwise, the user will need to click on the Charge button within the sales invoice to process an invoice as charge.
-
Set the Discount field in the Terms section to list the standard discount (if any) allowed to new customers on their invoices. To set the discount, perform the following two steps:
-
Set the proper discount template by clicking on the right arrow button to the right of the discount field. A drop-down list will display all the discount options. If no discounts are offered, keep the entry field set to (None) and ignore the second step.
-
If you select a discount template, you will need to enter the discount detail information. For example, if the "__ % paid in __ days" option is chosen, the discount percentage and the number of days in which the customer is allowed to take the discount must be entered. Review the Discounts and Finance Charges section for more details.
-
-
Set the standard Due terms for any new customers. If a credit application needs to be filed before terms are offered, select Cash as the Due setting. Otherwise, set the Due date which requires two steps:
-
Set the template entry by clicking on the right arrow and selecting one of the options. If this field is set to (None), the customer will be issued an invoice with no terms. The most common due template is "Net __ days." Complete this entry by setting the days to 30, as shown in the next step.
-
A template may require term details such as a date or number of days. For example, if Net __ days template is selected, the exact number of days must be set to complete due date terms. Net 30 days is standard.
-
-
Select the standard Grace Period option. The Grace Period setting affects the finance charge calculation, because it calculates the finance charge from the grace period date, rather than the due date. For example, the invoice may show a due date of "Net 15 Days" but a finance change is not applied until 30 days after the invoice date. The finance charge is not applied because the Grace Period option is set to 30 days after invoice date. The Grace Period options are as follows:
-
__ days after invoice date
-
__ days after due date
-
(None)
The first two options require the user to enter the number of days of grace.
-
-
Set the Monthly Finance Charge Rate that will be charged for any overdue customer invoices. Many companies charge an overdue finance charge rate of 1% to 2% per month. This computes to a total of 12% to 24% annual rates. Review the Printing Customer Statements section for more details on processing finance charges.
-
The Minimum Finance Charge amount is the minimum charge per invoice. If the calculated finance charge for any overdue invoice is less than the Minimum Finance Charge, the finance charge amount will equal the Minimum Charge. (Zero this field if you do not wish to set a minimum charge amount.)
-
Leave these fields blank: Delinquency Reason and the Credit Limit. These should only be set on an individual customer basis.
-
Leave the Ship To ID blank when entering defaults.
-
Set a default Shipping Method. Use the most common shipping method as the default.
-
Set the standard Freight Charge. For more information on calculating shipping charges, review Freight and Shipping Charges > Calculating and Comparing Freight Charges.
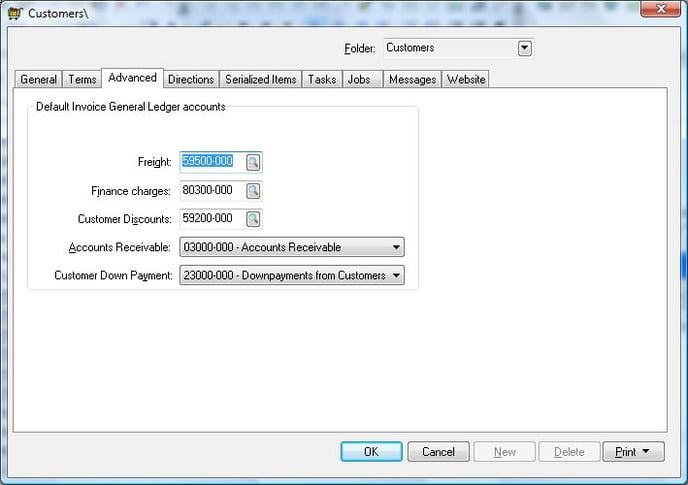
Advanced Tab
-
Set the Freight general ledger account to the expense account used to record shipping income. All Freight charges entered on the sales invoice footer will be posted to this account.
-
Finance charges general ledger account should be set to the revenue or miscellaneous income general ledger account used to record any finance charge income collected from a customer. Review the Printing Customer Statements for more details on processing finance charges.
-
The Customer Discounts general ledger account should be a cost of sales or expense general ledger account that records any discounts given to a customer.
-
Set the Accounts Receivable trade account that is affected when a customer invoice is processed. Review Accounts Receivable Transactions for details on this account.
-
The Customer Down Payment account records any down payments or deposits collected from a customer. This should be a liability general ledger account.
Auto Send Tab
-
Enable the Exclude customer from all AutoSend batch modes, except Payments setting if the entire group of customers should be excluded from the Auto Send email process. (This option can be set from a sub-folder, if there is a certain group of customers that should not be automatically emailed.) Review Auto Send Overview for details on the Auto Send feature.
Messages Tab
-
If you wish to enter messages that appear on all vendors, enter them into the Messages tab. Review Custom Messages for instructions to create messages.
Copying Default Values
To copy the default values from the root folder into the subfolders, filter down each default value for each entry field within each tab. Review the Edit Defaults, Filter Down Data, and Globally Change Data section for detailed instructions on this copy process.
Click the OK button to return to the options window.
Repeat the steps above if you wish to set different default settings for subfolders than the defaults set for the root Customer folder.