Use a task as a work order to schedule, track, and invoice service requests or projects.
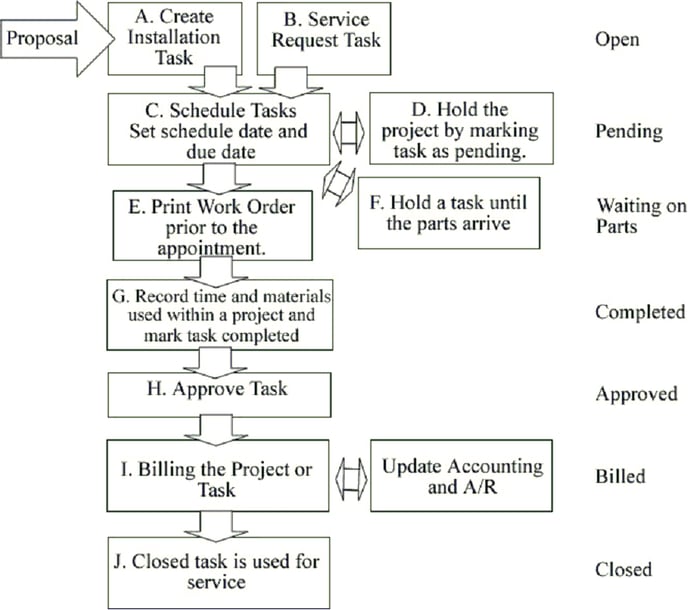
The following flow chart depicts the typical flow of information within the EBMS work order system using tasks.
Status Settings

-
A service task can be created from an inventory item that is entered within a sales order or a proposal. The user is prompted to create tasks when the Process > Create Sales Order wizard is launched from the Proposal menu, if service inventory codes are contained within the quote. The Enter tasks for this item option within an inventory service item must be enabled to create tasks using the wizard. The user will be prompted to create tasks within a sales order if a service inventory item containing a task type is entered within the sales order. Review the Attaching a Task to a Service Item and the Creating a Task from a Proposal or Quote sections for more details
-
A task work order can be created at the time of the service request and attached to a sales order at the time the service is billed. Review the Creating an Open Task section for more details.
-
The task module contains scheduling tools that allow a company to schedule individual technicians or crews. Review the Scheduling Tasks section for more details.
-
Review Mapping and Location Services to use the map tab to view directions or create a route.
-
A task can be put "on hold" by marking a task as Pending. This feature is used to hold a service work order rather than scheduling or completing the task.
-
Technicians often use a printed work order when a computer is not convenient. The work order can be used to track parts, record labor, and make notes. The work order also includes a bar code that is useful if scanners are used. A variety of work order forms can be generated from the task module. Review the Printing Tasks and Work Orders section for printing options.
-
A task or work order may be put on hold if the technician is waiting on parts or materials to complete the task. Review the Waiting on Parts or Materials section for more details.
-
Configure the associated task views to conveniently show tasks associated to the same invoice or customer. Review Associated Tasks to show multiple associated task tabs within a work order task.
-
Record the time, parts, and details about the project. Mark the task completed when the project is completed. Documenting a task is valuable for tracking parts, managing labor, and maintaining a historical record about the project. Review the Recording Parts and Materials in a Task section and Recording Labor and Completing the Task for more details.
-
The approval is an optional step used when a manager is required to review some or all work orders before a task is billed. Review Approving Tasks and Assigning a Manager for more details.
-
Billing the project or task is done after a task is completed and approved. Review the Billing a Project or Task section for more details.
-
Task history can be reviewed at any time supplying the user with maintenance history for a worker, piece of equipment (serialized item), or job. Review the Reviewing Task History section for more details.
