The EBMS software contains features to manage inventory across multiple locations. The software identifies each location as a Warehouse although a warehouse may identify a service truck, store, or other location type.
Complete the following steps to create multiple warehouses:
-
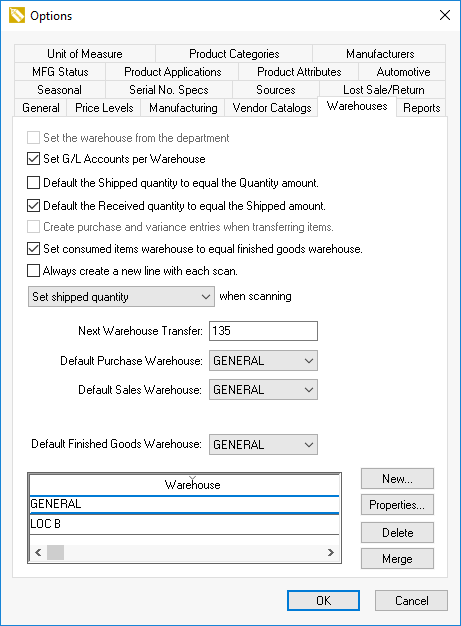
Configure warehouse settings by going to Inventory > Options from the main EBMS menu and selecting the Warehouses tab as shown below:
-
Review the Multiple Location Overview section to decide how the important warehouse defaults on this dialog should be set up.
-
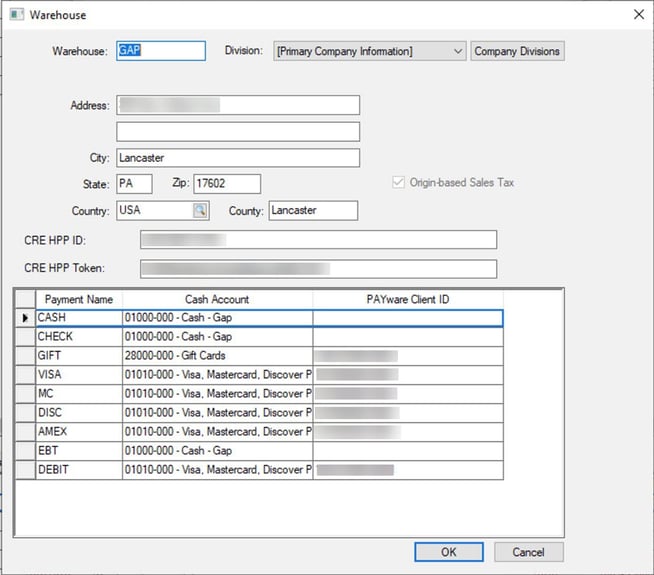
Click on the New button on the right side of the Warehouses tab to create a new warehouse or click on the Properties button to edit warehouse settings for an existing location. Either action will open a dialog labeled Warehouse, as shown below:
-
Enter the Warehouse ID that identifies the storage warehouse, store, truck, or other inventory location. This ID is widely used throughout EBMS and the inventory location should easily be identified by this code. A warehouse may identify a division or profit center, as shown above. This feature allows the user to change the logo or other information based on the selected Division. Review the Company Setup > Company Profiles section within the main documentation for details on the Division setting.
-
The warehouse Address setting should be the shipping address for the current location. If you are setting up a new warehouse location, do not enter the mailing address for the established headquarters. This location setting is used to calculate shipping costs and sales tax. Review the following sections for details on where this address may be used:
-
Sales Tax location: Review Set Up Sales Tax for Multiple Locations in the sales documentation.
-
Shipping origin: Review the Calculating and Comparing Freight Charges section within the sales documentation.
-
GPS origin: Review the Online Routing and Directions section within the sales documentation.
-
-
Add the CRE HPP ID and CRE HPP Token settings if the virtual terminal is different for different warehouse locations. Review Selling Inventory from a Warehouse for HPP setting details.
This dialog may contain other warehouse-based settings. Review the following examples:
-
Payment Information: Review Undeposited Funds, Deposits, and Reconciling Cash Accounts in the sales documentation for more details.
-
Department settings: Department settings are required if the Set the warehouse from the department option is enabled on the Inventory > Options > Warehouses tab. Review the Associating each Warehouse with a Single Company Division and Department section for more details on the department settings.
Click OK to save warehouse settings.
Repeat the steps above for each warehouse location.
Click OK to save option settings.