The inventory classification for a product is the primary setting that determines the way the EBMS software handles that product. The Classification setting is an important setting that should be configured properly before items are purchased or sold. This section will describe recommended steps to change this important setting in the following scenarios:
- Change a product from a classification of No Count to Track Count to manage inventory counts and values in more detail.
- Change a product from a classification of Track Count to a classification of Serialized Item or Lots to manage more detail.
- Change a kit from a materials list within a sales invoice (classification of No Count) to a manufactured kit (classification of Track Count).
- Change a service item that is only sold to a service (classification of No Count) that is purchased from a subcontractor (classification of Track Count).
Click on the hyper-links in the descriptions shown above for more information on specific scenarios.
Report to Review Classification Changes
EBMS contains a report that will list the history of an item's classification settings. Select the File > report to generate the following report:
This report will list each time a classification change happens.
Note that any classification set for an item with no transactions will not be displayed.
Steps to Change an Inventory Classification
Changing the inventory Classification for an existing item is possible but contains various limitations. Try to change the Classification for the product in the simplest way possible (shown below in OPTION 1) but if the system does not allow a direct classification change on the product record, continue with the steps for OPTION 2.
OPTION 1:
Change the classification from the product record General tab: The system will bar the user from completing this step if the product code is listed on any existing order OR if the item contains processed inventory that does not equal zero. Continue on with the next steps if the system bars the user from completing this step.
The Classification field can be changed by clicking on the Change button and then selecting the new Classification from the drop-down list, as shown below: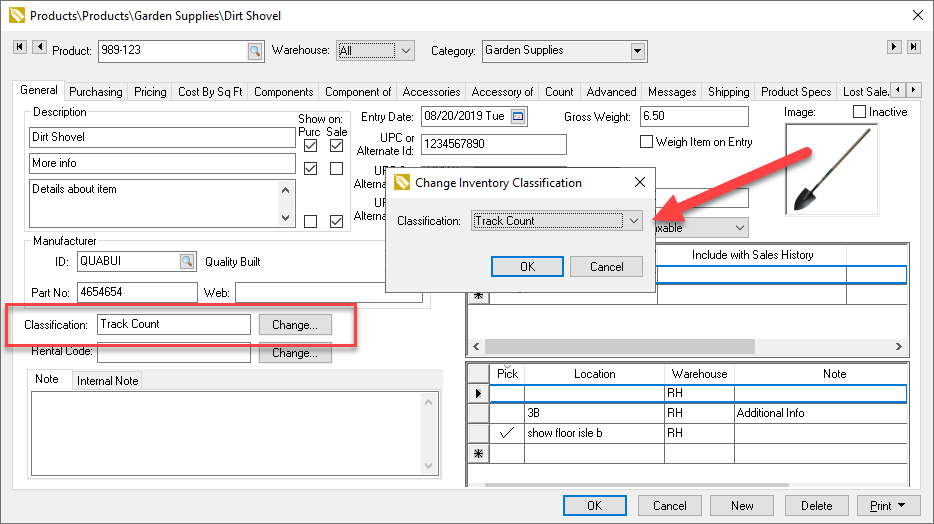
Click OK to save the change.
This step completes the process if it is successful, but it may not be allowed. Continue on with the next steps in OPTION 2 if the system does not allow a simple classification change.
OPTION 2:
Change the original item's Product ID to another product code by adding a suffix. This step will allow the user to create a new product item with the same Product ID as the original.
Complete the following steps to change the Product ID:
Right-click on the Product ID as shown below.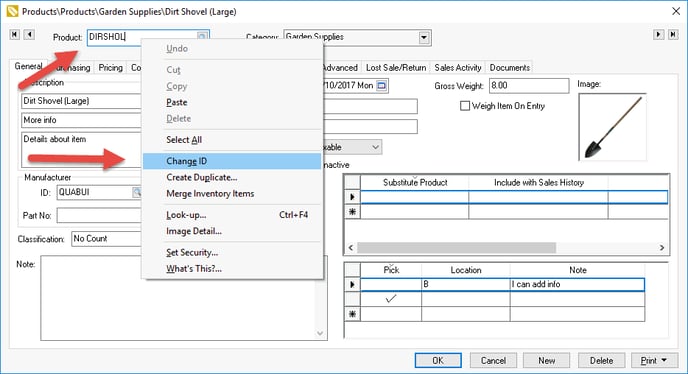 Select Change ID from the context menu to open the following New Product ID dialog:
Change the Product ID by adding a suffix. In this example, -TMP is added to DIRSHOL to create the new product ID DIRSHOL-TMP.
Click OK to save changes.
Create a new product item by duplicating the original inventory item:
Right-click on the new Product ID (for this example, the Product ID is now DIRSHOL-TMP) and select Create Duplicate from the context menu, as shown below.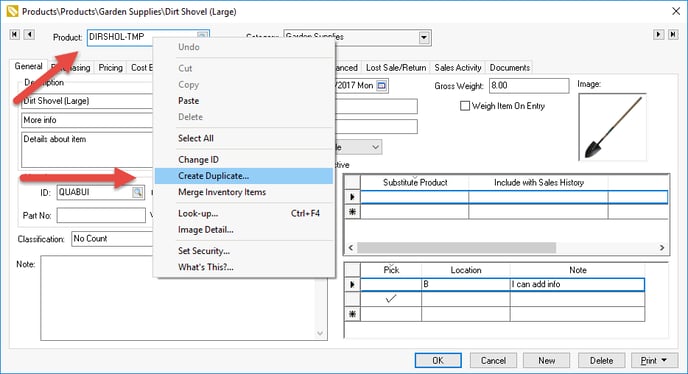
- Selecting Create Duplicate from the context menu will launch a new product wizard. Review Entering New Products for more details on creating a new product item.
- Set a new Classification option (found on the 2nd wizard page) and any other inventory settings that need to be changed from the original. Make sure this is the classification you want for the product long term.
- Set the Product ID (found on the last page of the wizard process) to the original code. (In this example, the Product ID would be changed back to DIRSHOL.) This will create a duplicate product with an updated classification and the original Product ID, but no transaction history.
Complete the following steps if the item has an inventory count value that is NOT equal to zero. Go to original product record's Count tab and check the Processed total. 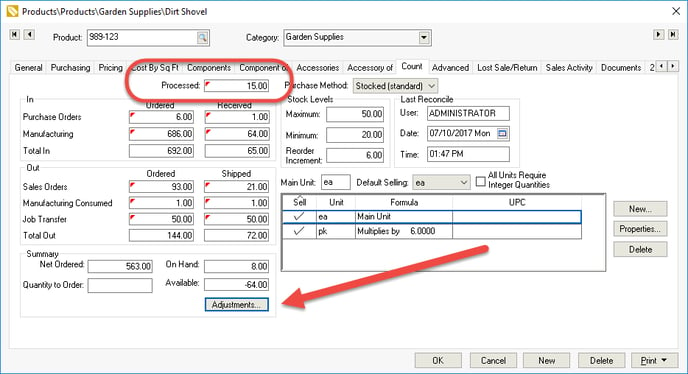
Record the current inventory value by printing an inventory count and value report for this item or a folder group of items. Launch the report by going to File > Reports > rint the following report:
Record the total Perpetual Value for each Inventory Asset Account as marked with the arrow. This total will be used in later to verify that the inventory value adjustments are correct, and these numbers will change, so print out the report for reference.
Move inventory counts and values to adjust both inventory items (both the item with the suffix and the new item):- Decrease the value of the original inventory item (now with the -TMP suffix) to zero.
- Add the same inventory value (and count value if the unit of measure is the same) to the new item with the original product code.
IMPORTANT: The value amount that the first item decreased must match the value amount that the second item increased. This will keep your inventory counts consistent over time. - Individual adjustment instructions for the following inventory item classifications:
- Track Count: Adjusting Inventory Count and Value
- Serialized Items: Viewing or Changing Serialized Items from the Inventory Item
- Lots: Tracing Lots and Reporting Lots Information
- Repeat these steps for each inventory item within the previously printed Inventory Value report that requires a classification change.
- Generate the Inventory Value report again and compare the individual item values. Compare the second report total to the original total printed earlier in this process. These totals must match to maintain inventory value totals going forward.
The last step is to discard the original record that now has the Product ID with a suffix of -TMP. (In this example, DIRSHOL-TMP.) The following options are important steps to remove this item from the product catalog:
Merge and copy history: This option is recommended if the new inventory item created is the same product as the original item (now with the suffix of -TMP). This option will change and move all sales and purchase history from the original item and move it to the new item. History is important when projecting sales and other features of the purchasing screen and creating inventory stock levels.
Complete the following steps to merge an item:
Change the Classification of the original item. (This is the item with a suffix of -TMP as described at the beginning of this section. In this example, DIRSHOL-TMP.) Now that there is no inventory value associated with the DIRSHOL-TMP Product ID, it is possible to change the Classification field on the product record General tab.
Right-click on the new Product ID (in this example, DIRSHOL) and select Merge Inventory Items from the context menu. It will open an Inventory Item Merge page, as shown below.
- Select DIRSHOL-TMP as the Inventory item to delete.
- Select DIRSHOL as the Inventory item receiving history.
- Double check all settings, because merges cannot be undone.
- Click Merge to merge all item history from DIRSHOL-TMP into DIRSHOL.
Alternative option:
Inactivate and start new item with no history: This option is only recommended when the new item is different than the original item. Example: The new product is a very similar to the original, but it is a different brand, type, or unit of measure, or it is the same product, but packaged differently. The inventory history will be of no value if the item is different. Review Making an Item Inactive for details on how to deactivate an inventory item.
Repeat the steps above for all the inventory items that require a classification or other change to the inventory record. Because switching an inventory classification is such a labor-intensive change, it is worth thinking through classifications thoroughly for new inventory types. See Inventory Classifications for setup instructions.
Other Scenarios
These change classification steps may be helpful to follow in some other scenarios, besides the standard classification changes.
-
-
An inventory unit of measure change: Review Changing a Unit of Measure for instructions and issues to consider when changing the UOM for an inventory item.
-
A substitute or replacement part: Review Substituting an Inventory Item for the recommended steps for new substitute items.
-
.