General vendor information may be changed at any time after the new vendor has been entered. Additional information may be entered into this window such as miscellaneous notes, etc. The vendor window is also very useful in viewing history, such as invoices and purchase orders, as well as payments made to the vendor. Review Vendor History section for more details.
Open the vendor information window by going to Expenses > Vendors. If you wish to create a new vendor, follow steps listed in Adding a New Vendor section. Select the vendor you wish to edit to open the following window:
Right-click on the vendor field to open the edit menu and change the vendor's ID. Select Change ID, which will start a lengthy process of changing this vendor's ID throughout the system. It is possible to load a different vendor by clicking on the lookup button to the right of the vendor entry field and selecting a new vendor.
The vendor's folder can be changed by clicking on the down arrow button to the right of the Category field and selecting a new folder from the dropdown. (Remember to click OK to save edits to any vendor fields.)
Function Buttons
The function buttons at the bottom of the vendor information window perform in the following manner:
-
OK will save changes and return to the main window.
-
Cancel will not save changes before returning to the main window.
-
New will bring up the window to start entering a new vendor. Review the Adding a New Vendor section for details on the new wizard.
-
Delete will delete the selected vendor. Note that a vendor cannot be deleted if transactions exist in any year tabs. Instead of deleting a vendor, they should either be merged with another account or moved to an inactive status. For further information on merging an account or making a vendor inactive, review the Making a Vendor Inactive section.
-
Print has a drop-down list of reports linked to this window. A report can be added by selecting Add Report from the Print drop-down list.
General Tab
On the General tab of a vendor record, the Name, Address, and Contact Information may be changed at any time. The following dialog will appear if the address has changed:
Note that this utility will overwrite any manual address changes made to any of the selected documents. Click on the following address change options:
-
Yes to change all the documents listed on within the message box.
-
No to change only the documents that match the original address. This option differs from option A in that any document that contains an address that does not match the original would not be overwritten with the new address changes.
-
Cancel will not change any documents but will change the vendor's address information for all future documents.
A dialog will appear to summarize the changes.
Blank all the name and address entry fields to create a miscellaneous vendor. An ID must still be entered. (Examples: MISC or MISCVEN.) When entering the miscellaneous ID in a purchase order or invoice, the system will prompt for the vendor's name and address. Review Miscellaneous Vendor Overview section for more details.
You can enter an optional vendor Type for each vendor to be able to put vendors into specified groups for querying. Example: If you want to keep track of all your vendors who have a local warehouse, enter a type "Local" and then query by this entry. The Type field is very useful when vendors are part of more than one group. If you wish to group a specific vendor within two or more different groups, the type field will allow you to do this. Grouping vendors only by folders is limited, since each vendor can only appear in one folder. By entering a group of keywords or group names within the Type field separated by a comma or space, the user can then query the vendor by any type or combination of types.
EXAMPLE: Miller's Service Center's type field may contain "Supplier, Maintenance, Local," which allows the user to include Miller's Service Center on the Supplier Vendor list as well as the Maintenance Vendor list and the Local Vendor list. This is accomplished by using the query option on the vendor.
The Note field may be used to enter miscellaneous comments pertaining to a specific vendor. The length of this entry field is not limited but will scroll if more information is entered than what can be displayed on a single page.
The Contacts tab contains a list of vendor contacts that is used within a purchase order or invoice. Review Contact Management for information on contact setup.
Vendor Terms Tab
Complete the following steps to set term information:
Go to Expenses > Vendors and select a vendor to open a vendor account record. Once on the specific Vendors page, go to the Terms tab:
The Payment Vendor ID identifies the vendor that will be receiving the payment for any expense invoices. This entry will normally be equal to the Vendor ID at the top of the record, unless the vendor requires the payment be sent to a third party. For example, if Parts America requires that payments be sent to John's Check Services, then the main Vendor ID would be Parts America and the Payment Vendor would identify John's Check Services.

Enter the following Order Information details:
- Account number: The identification code assigned to your company by the vendor.
- Minimum order: Enter the minimum order amount. Leave the value at zero if no minimum order amount is required. When a purchase order is processed and the dollar amount is less than the amount specified in this field, a message will be displayed stating that the invoice is below the minimum order.
- Credit Limit: Enter any credit limit that was given by the current vendor.

Enter the following Tax Information settings:
- Vendor receives 1099: Enable this option if this vendor requires a 1099 form.
- Tax ID: If this vendor gets a 1099, they must supply their tax ID number. This will be either a social security number or an Employer Identification Number.
- Legal Name (Proprietor): Enter the proprietor's name as it should be displayed on the 1099 form.
Enter the average Lead Time in Days required for product delivery date of order. This value is used to calculate the estimated ETA Date within the purchase order unless the inventory item contains specific Lead Days. Review the Estimated Time of Arrival (ETA) Date section of the Inventory documentation for details on the ETA Date calculation.

Enter the Terms settings:
Discount: Use this field to list the discount that the vendor allows to be taken on their invoices. If the vendor does not offer discounts, leave the default as (None). To set the discount requires two steps:
- Set the proper discount template by clicking on the right arrow button next to the discount field. A drop-down list will display all the discount options. Select the applicable discount template from the list.
- If the discount template is set, you will need to enter the discount detail information. For example, if you set the option to "__ % paid in __ days" you must enter the discount percentage and the number of days in which the vendor allows the discount to be taken. For example, this template could be "10% paid in 10 days" or "100% paid in 30 days" once the formula is filled in. Review the Discounts section for more details.
Due: Use this field to set the due date terms. If this field is set to (None), the system will not prompt the user that the invoice is due. Similar to the discount field, the due date requires two steps:
- Select the due date template by clicking on the right arrow and selecting one of the options. If the vendor's due date terms are unknown, "Net __ days" is the most common type of terms. Complete this entry by setting the days to 30 as shown in next step. The options Cash, Collect on Delivery, and Due on receipt are all processed as due immediately.
- The due date template may require term details such as a date or number of days, so once a template is selected, fill in the numbers that complete the formula. For example, if "Net __ days" template is selected, the exact number of days must be set to complete the formula. Usually, Net 30 Days is standard, so fill in the blank with the number 30.
The Payment Vendor ID identifies the vendor that will be receiving the payment for any expense invoices. This entry can be left blank if the Payment Vendor is equal to the billing Vendor ID. For example, if Parts America requires that payments be sent to John's Check Services, then the main Vendor ID would be Parts America, and the Payment Vendor would be John's Check Services.
NOTE: The Pay-From Account and the Direct Payment Information must be set within the payment vendor record rather than the billing vendor record. If the Payment Vendor ID is entered on this vendor recommend than open the payment vendor record and set the Direct Payment Information within the payment record.
Enter the optional Pay-From Account: Keep this setting blank unless the vendor is going to be paid from a specific checking or cash account. This setting is required to make a direct ACH payment to the Vendor.
Complete the Direct Payment Information settings to enable the ability to directly pay a vendor using an ACH payment:
- Account Number: Enter or verify the bank account number within the Account Number entry.
- Account Type: The bank account type should be set to Checking.
- Routing: Enter the bank routing number of the originating bank for direct deposit transactions.
- Description: Enter the direct payment description of the transaction.
Review the Direct Vendor Payments ACH section for more details in the direct payment settings.
Vendors Advanced Tab
Go to the Expenses > Vendors, select a vendor, open the vendor record, and go to the Advanced tab.
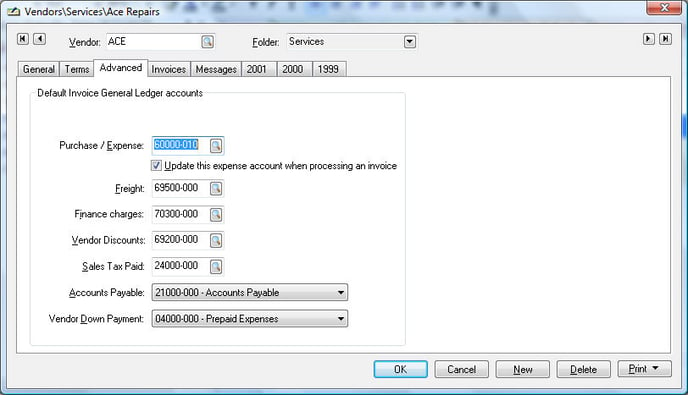
The Purchase / Expense account can be used in two different ways and is directly affected by the Update this expense account when processing an invoice switch.
-
If you wish to have the general ledger account within an expense invoice default to a specific account, enter the account in the Purchase / Expense entry field and turn the "Update this expense account when processing an invoice" switch OFF.
-
If it is more convenient to have the system automatically store the most recent general ledger account used on the first line of the expense invoice, turn "Update this expense account when processing an invoice" switch ON. This is the most common method used for this field.
The remainder of the fields in this tab consists of general ledger accounts used to process vendor invoices and is normally set within the Edit Defaults process in the Vendor Folder window. Review the Adding and Deleting Vendor Folders section for more details.
The information in the Invoice tab and each of the year tabs is updated as expense invoices are processed. Review Vendor History for more details on these tabs.
Invoices Tab
The information within the Invoices tab lists sales orders and invoices by status as expense invoices are processed.
Click on individual columns to sort and search by Invoice Date, Invoice number, Status, and P.O. number. Click on the New Invoice button to create a new purchase order or invoice from this tab.
Proceed with Vendor History for more details on the Invoice tab.
Messages Tab
This tab inserts and edits messages. For details on inserting and editing messages, review Custom Messages.
Map Tab
Review Map to use the map tab to view directions or map of vendor location.