In this article
The Receiving Process | Use Cases and Scenarios | Features | Related Content
Setting Up a Receiving Process
A good receiving process helps maintain accurate inventory counts and optimize customer order delivery. Validate vendor billing by verifying that the quantity purchased matches the quantity shipped and reviewing that all the costs are correct. A bad receiving process can quickly create incorrect stock levels and frustrate sales staff who are attempting to deliver customer orders in a timely and efficient manner. Combine an organized method of creating purchase orders with a reliable receiving process to streamline purchasing and sales. Implement product scanning, labels, and a defined process to manage inventory in an accurate and efficient way.
EBMS contains the tools to create reliable processes to create a well-run receiving department within almost any company.
Three Step Receiving Method
The Inventory Receiving module within EBMS includes a three-step inventory receiving method:
- Purchase Order (PO) at the time of purchase.
- Back Order at the time shipments arrive.
- Invoice Processing at the time the expense invoice arrives.
This article addresses the following steps in the inventory receiving process. Click the links to jump to individual steps.
Creating Purchase Orders
The first step is to create a new purchase order. EBMS contains the following tools for creating purchase orders:
-
Create a purchase order from the Purchasing dialog: Review Using the Purchasing Page to Create Purchase Orders for more details on this method.
-
Create a purchase order from a sales order: Review Purchasing Special Orders for more details on creating POs from sales orders.
-
Manually create a purchase order: Review Entering a New Purchase Order for instructions on creating a PO from scratch.
Notice that the Net Ordered amount found on the product recordwill be increased as soon as purchase orders are created. The On Hand amount will only be increased when the Received column in the purchase order is populated. Review Item Count for more details on the inventory count values.
Estimated Time of Arrival (ETA) Settings
Each purchase order contains estimated time of arrival (ETA) settings on the purchase order as well as individual detail lines. These settings can be defaulted from the vendor or from individual product record settings. Review Estimated Time of Arrival (ETA) Date for details on using and configuring these settings.
Review Costs
The Unit Cost of each product defaults either to the Purchasing tab vendor Cost or the Pricing tab Cost field on the product record. This default depends on the settings as shown below. If the Default cost for inventory item to specific vendor's cost instead of last cost option is selected, the vendor cost from the product record Purchasing tab will be the default unit cost. If that option is not selected, the product record Pricing tab Cost will be the default unit cost.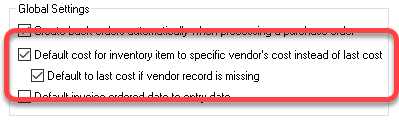
IMPORTANT: Update inventory costs to update pricing if pricing is calculated from cost. Review Updating Costs to Calculate Pricing for steps to update costs and pricing.
Receiving Product
The receiving step is used to identify when product arrived from the vendor. This step requires the Received quantity to be populated within a purchase order, using either the receiving or the purchase order dialogs.
Enter the Receiving amount within the Receiving dialog or the Received value within the purchase order dialog to allow the product to be sold. (To open the Receiving dialog, go to Expenses > Receiving.) This step will increase the On Hand total found in the product record Count tab. The Inventory asset value in the General Ledger is not increased until the purchase invoice is processed.
Product can be received using either of the following dialogs:
-
Receiving dialog for a receiving department. (Access this dialog from Expenses > Receiving.)
-
PRO: This dialog allows users to purchase back orders without processing a purchase order into an invoice.
PRO: Costs and other purchasing details unnecessary to the receiving process are not shown on the receiving dialog.
PRO: The product list within the receiving dialog is color coded.
PRO: All back orders are combined into a single document based on the purchase order number. Review Receiving Dialog for more details on how to use this EBMS feature. -
CON: Purchase order costs and details cannot be changed from the receiving dialog.
CON: Product labels must be printed from the purchase order, not the receiving dialog.
CON: Users cannot process landed costs or distribute shipping costs from the receiving dialog. -
Purchase order dialog for the clerical staff:
-
PRO: The purchase order displays costs and other purchasing information not included on the Receiving dialog.
PRO: Product labels can be printed from the print menu within the purchase order.
PRO: Tools to adjust Landed Costs or distribute shipping costs are included in the purchase order dialog.
PRO: The purchase order allows users to update inventory costs before processing the purchase order into an invoice. Review Receive Items Against a Purchase Order for instructions to populate the received quantity within a PO. -
CON: A purchase order must be processed into an invoice before back orders can be created.
Using Barcodes
Scanning product barcodes can be efficient way to manage inventory receiving, sales, and count management. The barcode must match the product and the correct Unit of Measure. Review Barcode Overview for more barcode details.
Printing Barcode Labels
Some products may not contain UPC or other useful barcodes that are recorded within the product catalog. Printing labels for items without UPC codes can be an important step of the receiving process. Review Printing Labels and Reports for instructions to generate labels from the purchase order.
Scanning UPC Barcodes
The following methods are available to populate the quantity Received using a barcode scanner:
-
dialog: Complete the following steps to receive product using a barcode scanner:
-
Open the Receiving page by selecting Expense > Receiving from the main EBMS menu.
-
Select the relevant Vendor ID and P.O. number for the product that is being received.
-
Scan the product UPC code with a compatible scanner for all items being received. The barcode for each item should be scanned to calculate the quantity of the item received.
-
Click the Process button to complete the receiving step for the entire shipment. Review Receiving Dialog for more details.
-
-
Mobile Scanner: Review Mobile Scanner > Receiving for instructions to use a mobile scanner to receive product without using an EBMS dialog.
Receiving Special Order Products
Use the Special Orders tab of the Purchasing dialog to schedule the purchase of special orders to fit the customer or manufacturing process' required arrival date. (Access this dialog from Inventory > Purchasing.)
Review the last section: Purchasing special order items from the Special Orders tab of the purchasing screen within Purchasing Special Orders to schedule the arrival of special order product. Review Receiving and Processing Special Orders for steps to receive and process special orders from customers.
Managing Stock vs. Reserved Inventory
Product received from vendors may be placed into inventory stock or reserved for an order or job. Stock product should be placed into stock and reserved inventory should be placed in a staging area.
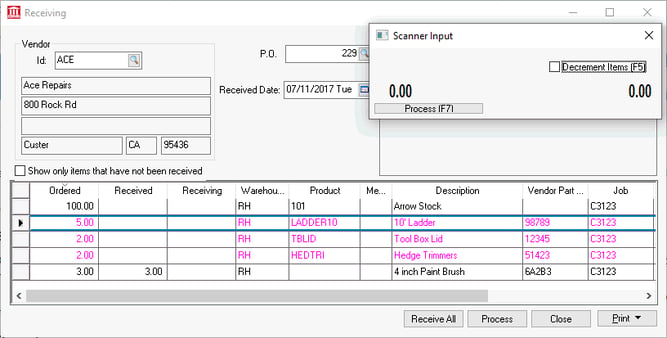
Open the Receiving dialog (Inventory > Receiving) to review multiple products within a single purchase order as shown below: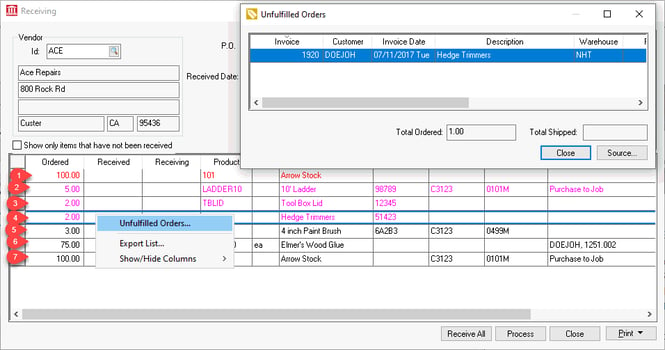
Stock inventory should be placed within the store or warehouse: See line #1 in the example PO shown above. The receiving process will increase stock levels by adding the received quantity to the On Hand value found in the product record Count tab. Review Item Count for more information on stock count details.
Reserved inventory should be placed into a staging area that is separate from regular inventory stock. Product that has been reserved to fulfill an existing sales order or job should be placed into the appropriate staging area. Sales orders and jobs with product already pulled from inventory must be handled properly to maintain accurate inventory counts.
Reserving inventory is accomplished using the following methods, based on the type of inventory reservation:
From the Receiving dialog, open the sales order containing special orders (products with Sync Quantity or Associated purchase methods) by double-clicking on the Linked document to open the sales order.
Complete the next steps (unfulfilled sales orders) to stage product within the sales order.
-
-
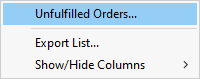
Unfulfilled sales orders are color coded within the receiving dialog as shown above. Right-click on any colored line, select Unfulfilled Orders from the context menu, and open the Unfulfilled Orders dialog as shown in the example PO above. Select and open a sales order from the list.
-
Note that some products may have unfulfilled orders and be allocated for a job. The receiving team has the discretion to direct product to a specific order or to a job, if the total of unfulfilled orders is greater than the amount being received. Remove the Job ID if product is prioritized for an unfulfilled order rather than the associated job.
-
Populate the Shipped quantity within the sales order. This can be accomplished by opening a sales order and using one of the following methods:
-
Scanning the product's UPC or printed label: Review Scanning Barcodes for instructions on how to scan barcodes to a document, such as a sales order.
-
Clicking on the Ship All option: Select from the sales order menu.
-
Manually enter the quantity Shipped: Manually enter the quantity Shipped to reflect the number of items staged for the customer order.
-
-
Jobs: See lines #2, #5, #7 in the example PO shown above. These products should not be placed into inventory since this product will be transferred directly into a job from the purchase order. Product that is temporarily placed into inventory before a job rather than staged should be processed using Job Transfers instead of associated with a job by entering a Job ID within the PO.
-
Sync quantity special orders: The sales order Shipped quantity is populated as soon as the product is reviewed within the receiving screen or purchase order. The Sync Quantity special order purchasing method should be used if product is staged. Review Special Order Overview for a more detailed explanation of the Sync Quantity purchase order method for special orders.
-
Associated special orders: See line # 6 in the example PO shown above.
-
Unfulfilled sales orders: See lines #2, #3, #4 in the example PO shown above.
-
Review Reserve and Stage Product or more details on managing reserved inventory.
Printing Labels
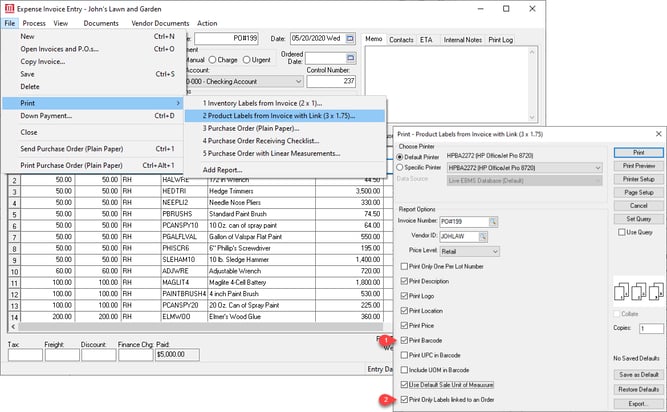
Printing product labels to add barcodes, descriptions, or optional pricing can make the receiving process more seamless, because it reduces the risk of mislaying reserved inventory and ensures smooth handoffs between teams. Print product labels directly from invoices by going to File > Print from the expense invoice menu and selecting which labels to print. For the example below, the report preset #2 is Product Labels from Invoice with Link (3 x 1.75).
For more details on this report, go to File > Reports > Expenses > Labels > Product Labels from Invoice with Link (3 x 1.75).
-
From the report options print page, enable the Print Barcode option to include a barcode of the sales order on the product label.
-
Enable the Print Only Labels linked to an Order option to only print labels for special orders.
Review Printing Labels and Reports for additional instructions to generate labels from the purchase order.
Processing the Purchase Invoice
The important conclusion to the purchase and receiving process is to process the purchase order into an expense invoice. Review Processing an Expense Invoice for instructions to process the invoice.
Review Selecting Vendor Invoices to be Paid for instructions to pay vendors for the received products.
Common Use Cases and Scenarios
Three Step Receiving Method
The Inventory Receiving module within EBMS includes a three step inventory receiving method:
- Purchase Order (PO) at the time of purchase.
- Back Order at the time shipments arrive.
- Invoice Processing at the time the expense invoice arrives.
Scenario 1: An automotive parts store regularly receives various parts from multiple distributors. Upon arrival, the vendor and purchase order number are entered into a mobile scanner to identify the shipment. Individual products being received are identified by scanning a UPC code or a case barcode. Amounts are incremented by scanning the product barcode or by entering the received quantity into the handheld scanning device. Reserved inventory is identified and staged to prepare to fulfill customer orders. Serial numbers, lot numbers, and other details are recorded from data within the vendor’s packing slip. Quantity and cost verification can be completed in real time within EBMS as product goes into inventory or is staged for customer delivery.
Scenario 2: A building supply company sells many specialty doors and windows to various building contractors. Hundreds of these special order products arrive in a single shipment and must be staged for delivery or customer pickup. The effort to properly label each door or window with the customer’s name, account number, and order number can be both time consuming and inefficient. Processing large quantities of specialty product that are ordered by the customer months in advance also requires a reliable inventory management system. The product handling process requires an efficient way to accurately verify quantities received, label each item, and properly stage product based on customer orders, unfulfilled sales orders, and available stock inventory.
Scenario 3: An agricultural parts and equipment sales company receives some products from local specialty vendors. These products do not come with an attached UPC code or other unique barcode. EBMS gives the user the ability to generate labels as the products arrive, including barcodes, descriptions, and optional pricing for each item. The user verifies the received quantity by labeling products individually. If there are too many labels or not enough labels, it indicates the received quantity from the purchase order does not match the number of products labeled. Color coded purchase order lines clearly indicate that unfulfilled sales orders exist, prompting the user to reserve product for individual customers.
Features
- Allows back orders to be created at the time Inventory is received, rather than at the time the Invoices are processed.
- Tracks the estimated receiving date of the shipment.
- Allows the user to view all associated back orders as a group instead of as different documents.
- Includes 3-Step Inventory Purchasing.