A customer payment receipt can be sent to the customer using the Auto Send email option.
Complete the following steps to set up an Auto Send Mode for customer payments:
-
Select from the main EBMS menu to open the following list:
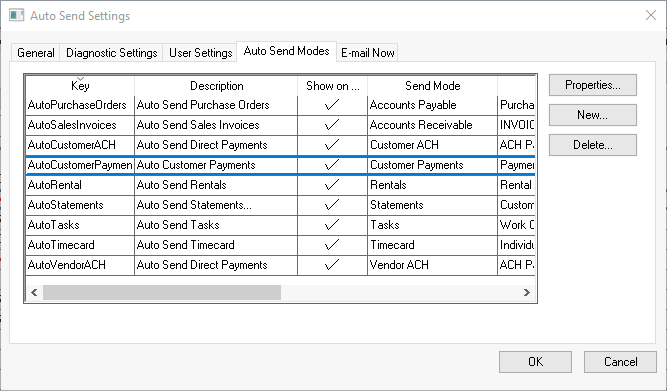
-
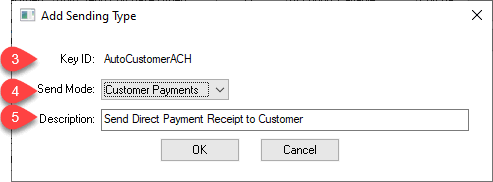
Click the New button to create a new Auto Send Mode and open the following dialog or select an existing Customer Payments Send Mode and click Properties. Skip to Step 6 if the mode has already been created:
-
Each Auto Send Mode requires a unique Key ID. This Key ID should be a simple descriptive code with no spaces or symbols.
-
Select the Customer Payments as the Send Mode option as shown above.
-
Enter a short Description of the auto send mode type. This description should clearly describe the mode process. Note that this text will be used as the EBMS menu label. Click OK to continue.
-
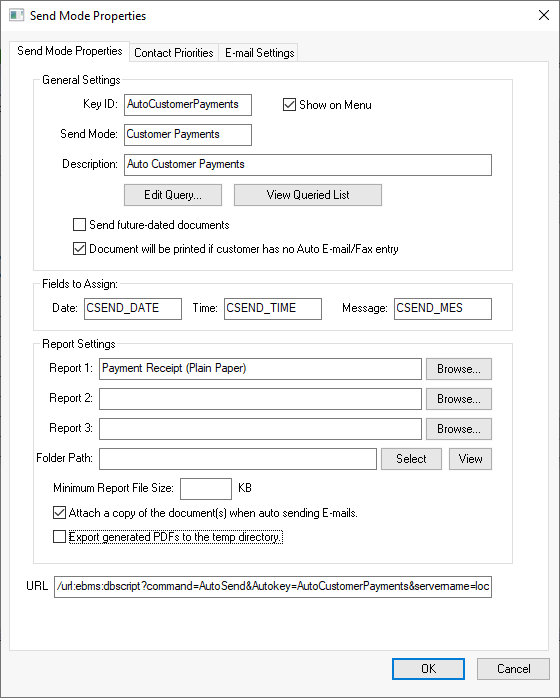
Configure the Send Mode Properties as shown below:
-
Enable the Show on Menu option to display the Customer Payment Auto Send mode on the EBMS sales menu.
-
Click on the Edit Query button to select the group of customer payments that were processed, as shown below:
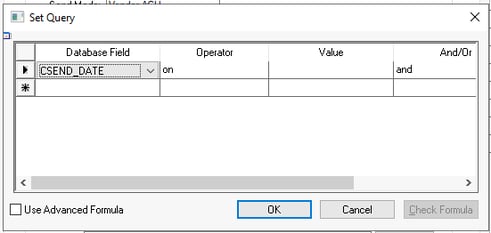
The query example shown above will send a payment receipt to all customers who made a payment. Review Set Query Options for more details on creating query expressions. Click the OK button to save. -
Click the View Queried List to view all payments and vendors that will be compiled in the payment report as shown below:
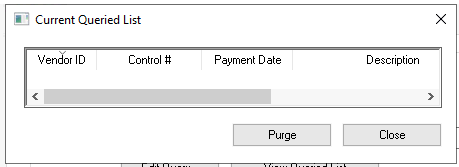
The Current Queried List window displays all customer payments that match the query and have not been previously sent. The Send Date must be blank.
Click the Purge button to populate the Send Date for all payments listed, removing them from a query. A purge is often required when a new query is created. Click the Close button. -
Maintain the default values for the Fields to Assign options, because they are advanced settings.
-
Enter the Payment Receipt (Plain Paper) report as Report 1. This report is specifically designed to use with Auto Send. Click the Advanced tab to configure the exported PDF attachment name.
-
Review Auto Send Additional Documents to include other reports with the email.
-
The Minimum Report File Size feature can halt an email send if attached export files are below a certain file size. This value should be set at about 10 KB less than the average exported PDF file size in order to stop blank reports from being sent as attached documents on Auto Send emails. (Please contact EBMS support for suggested values on this advanced setting.)
-
Enable the Attach a copy of the document(s) when auto sending E-mails option to attach a PDF file that is formatted for the customer to print. Disable this option to place the payment information on the email instead of an attachment. No attachments will be included with the email if this option is disabled.
-
Disable the Export generated PDFs to the temp directory option to record a copy of the document to the shared Export Folder identified in the Auto Send General tab. Enable this option only if the documents should be copied to the computer's temporary directory.
-
To automatically schedule and send Auto Send documents, configure the Timed Events option from the File > System Options > Timed Events tab. Review Timed Events for setup instructions.
-
-
Click on the Send Mode Properties Contact Priorities tab to enter the recipient options. Review Auto Send Contact Priorities for configuration details on these important recipient settings.
-
Select the Send Mode Properties Advanced tab to set the PDF Attachment Name for the reports configured in the Send Mode Properties tab. User-defined file names can be set for each of the corresponding reports set in the main property tab described previously in this section (Report 1, Report 2, etc.)
Set the optional Encryption Password to encrypt the attached sales document. You can use the same data format as the tags used in the E-mail Settings tab.

-
Click on the E-mail Settings tab as shown below:
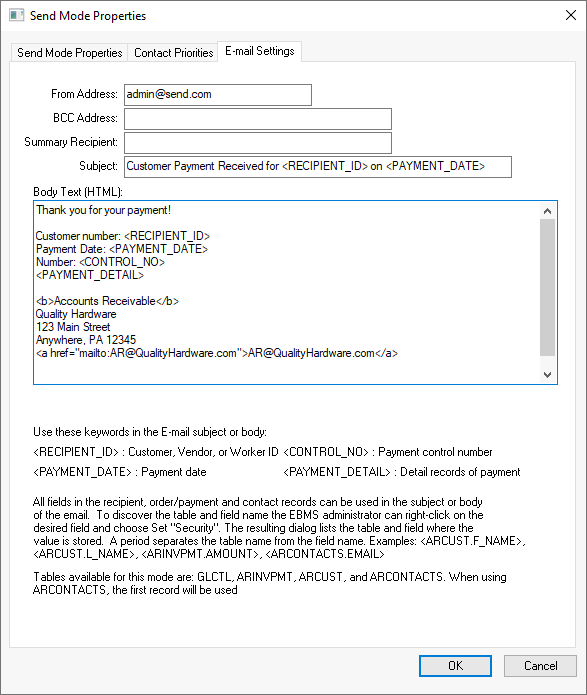
The E-mail Settings determine the details of the e-mail document that will be automatically sent.-
The recommended From Address is to match the From Address entered within the . Customer replies will be sent to this email.
-
Use the BCC Address to send a copy of all emails to an employee or department in charge so the accounting staff can verify the successful sending of the payment reports.
-
Enter an appropriate Subject line for the email type. (In this case, the subject line can be as simple as Payment Receipt but check the available keywords on the E-Mail Settings tab to customize and clarify your subject lines.)
-
Enter the appropriate Body Text using HTML or plain text syntax. The keywords list located at the bottom of the dialog can be used within the email body. Note that line break tags (<br />) may cause extra lines in the email.
-
Send Individual Payment Receipts
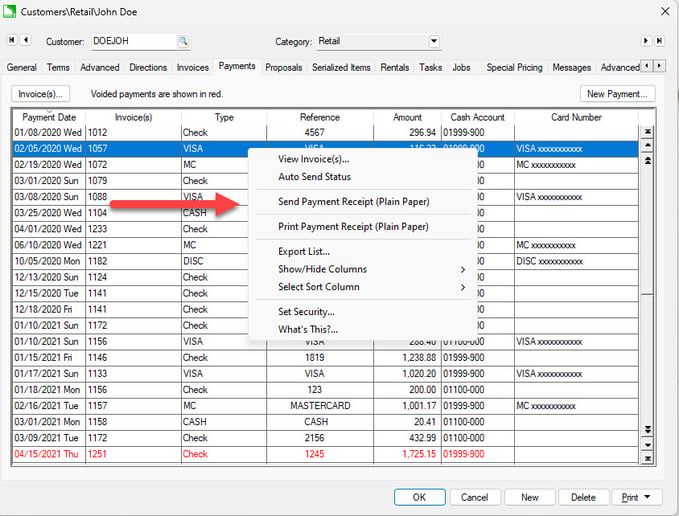
- Individual payment receipts can be sent or printed from the Sales > Customer Payments page.
- From a customer record, go to the Payments tab. Right-click on an invoice to open the context menu and select Send Payment Receipt or Print Payment Receipt.
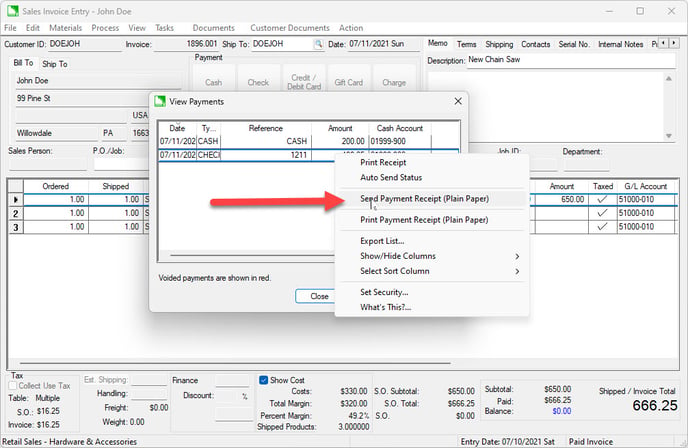
- From a sales invoice, select from the Invoice menu to send individual payment receipts. Right-click on a payment and select Send Payment Receipt or Print Payment Receipt from the context menu.
Customer Configuration
The customer record must contain contact information before a payment receipt can be automatically sent to the customer.
Open a customer record by selecting from the main EBMS menu and select a customer by double-clicking a customer name or highlighting the line and clicking the Select button. Click on the General tab > Contacts tab of a customer record to view the contact list as shown below.
Enter a contact Job Title that matches the setting within the Send Mode Contact Priorities dialog. Additional contacts can be added to this tab that are not related to any Auto Send modes.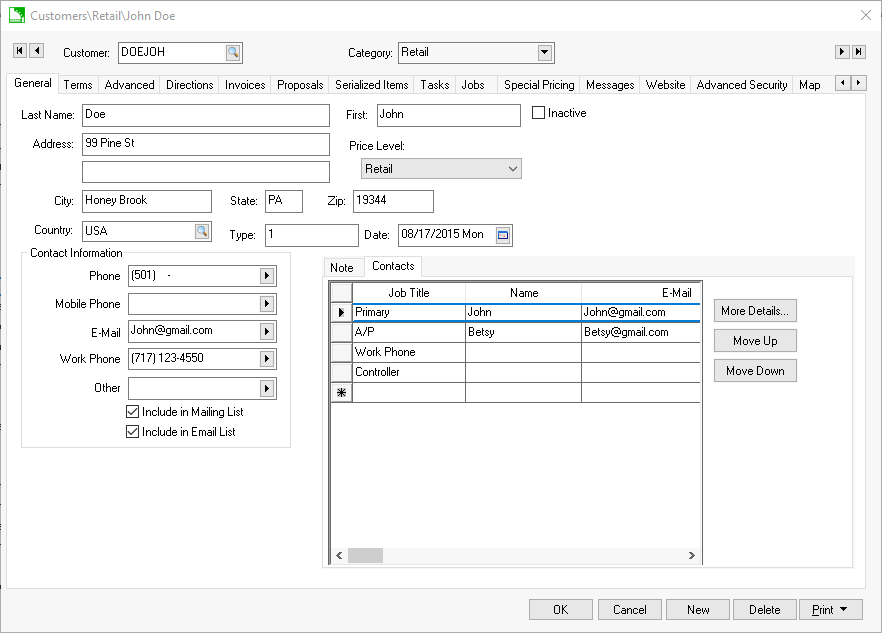
The Auto Send module will only use E-Mail and Fax contact types, so carefully configure those fields for any customers who should be receiving Auto Send email communication.
Review the Test Mode section for a way to put the system in test mode to determine if the setting options are set up properly.
The Auto Send customer payment receipt details can be found at the following locations:
- Review the Viewing or Voiding Customer Payments section to review the Auto Send details.
- Review ACH Payments for steps to configure required ACH payment information.