General customer information may be changed at any time after the new customer record has been created. The customer record is a useful tool in customer relations management. It contains history such as invoices and sales orders, as well as payments received from the customer. Review the Customer History section for more details.
Open the customer information window by going to Sales > Customers. If you wish to create a new customer, follow the steps listed in the Adding a New Customer section. Select a customer account to edit by double-clicking a customer in the list, which will open a customer record like this:
Right-click on the Customer field with your mouse to open the context menu, select Change ID, and change the customer's identification code. Selecting Change ID will start a lengthy process of changing this customer's code throughout the system. It is possible to load a different customer by clicking on the lookup button to the right of the Customer entry field and selecting a new customer.
Clicking on the down arrow button to the right of the current folder name and selecting a new folder can change the customer's folder.
The buttons at the bottom of the customer information windows work in the following manner:
-
OK will save changes and return to the main window.
-
Cancel will not save changes before returning to the main window.
-
New will bring up the window to start entering a new customer. Review the Adding a New Customer section for details on the new wizard.
-
Delete will delete the selected customer. Note that a customer cannot be deleted if transactions exist in any year tabs. Instead of deleting a customer, they should be merged or moved to an inactive status. For further information on merging and account or making a customer inactive, review the Making a Customer Inactive section.
-
Print has a drop-down list of reports linked to this window or a report can be added by selecting Add a Report at This Time. Review the Print Buttons and Menus section of the main documentation for more details.
General Tab
The Name, Address, and Contact Information may be changed at any time. The following dialog will appear if the address has changed:
Note that this utility will overwrite any manual address changes made to any of the selected documents. Click on the following address change options:
-
Yes to change all the documents listed within the message box.
-
No to change only the documents that match the original address. This option differs from option A in that any document containing an address that does not match the original would not be overwritten by the new address changes.
-
Cancel will not change any past documents, but will change the customer's address information for all future documents.
A dialog will appear to summarize the changes.
Blank all the name and address entry fields to create a miscellaneous customer. A miscellaneous ID must be made, however, such as MISC. When entering the miscellaneous code into a sales order or invoice, the system will prompt for the customer's name and address. Review the Miscellaneous Customers section for more details.
Select the inventory Price Level category for each customer by clicking on the down arrow and selecting from the available options. These price levels are created in the Inventory > Options > Price Levels tab. The price level that is selected will be used on any new sales invoices, reflecting the price level that will be used for any inventory item listed on the invoice. Multiple prices can be entered for each inventory item. Go to the Pricing tab on a product record to enter prices for each price level.
You can enter an optional customer Type for each customer, which will allow you to print out reports or query customers in specified groups. For example, if you want to keep track of all the customers within a delivery route, enter the route name in the Type field. This will allow you to query all the customers for a specific route. If a customer is part of multiple groups, list all the group names into the Type field and separate them with a space or a comma. Grouping customers by folders is limited, since a customer can only appear in one folder. By entering a group of keywords or group names within the Type field, separated by a comma or space, the user can then query the customer by any type or combination of types.
EXAMPLE: John Doe's type field may contain South Route, Deliver, Local which allows the user to include John Doe on the Delivery list as well as the Southern Route list and the Local customer list. This is accomplished by using the query option on the customer list report.
The General tab on a customer record has a pair of sub-tabs labeled Note and Contacts as shown below:

Click on Contacts tab to view the list of contact records. Note that the Primary contact record entries are also shown on the left of the Contacts list under the Contact Information group.
Enter custom Contact Information in the list of contact fields to the left of the Note. The contact labels can be changed by clicking on the right arrows to the right of the contact fields.
Review the Using Tasks for CRM section for more details about tracking contacts with customers.
Click on the Note tab to enter miscellaneous comments. The length of this entry field is not limited but will scroll if more information is entered than can be displayed on a single page.
Disable the Include in Mailing List or the Include in Email List to remove a customer from either list. These settings are found below the Contact Information list.
Terms Tab
- Click Terms to open the following tab:
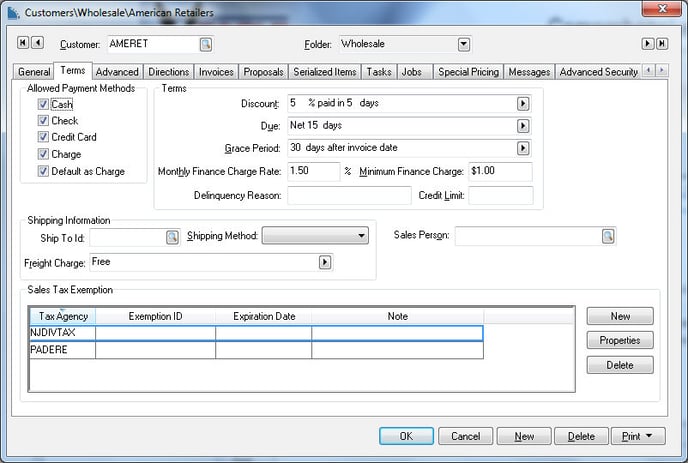
- Enable each of the Allowed Payment Method options that are acceptable as payment from this customer.
- Cash option should always be enabled.
-
Enable the Check option if this customer is approved to pay via check.
-
Enable the Credit Card option if credit cards are accepted from this customer.
-
Enable the Charge option to give terms to this customer.
-
Enable the Default as Charge option to make charge the standard terms for this customer.
-
Set the discounts and terms fields if the Charge option is enabled.
-
Set the proper Discount template by clicking on the right arrow button to the right of the discount field. A drop-down list will display all the discount options. If no discounts are offered for this customer, set the entry field to "(None)" and ignore the second step.
-
Enter the discount detail after the discount template is set. For example, if the "__ % paid in __ days" option is set, the discount percentage and the number of days in which the customer is allowed to take the discount must be entered.
-
Set the Due terms for this customer. To set this customer as cash, select Cash as the Due setting. Otherwise set the Due terms, which requires two steps:
-
Set the due template entry by clicking on the right arrow and selecting one of the options. If this field is set to "(None)," the customer will be allowed unlimited terms. The most common term template is "Net __ days." A "Collect on Delivery" and "Due on Receipt" term setting will cause the sales invoice to be processed as a charge invoice, but will set the due date as immediate.
-
Most due templates require term details such as a date or number of days. For example, if the "Net __ days" template is selected the exact number of days must be entered to complete due date terms.
-
Select the desired Grace Period option. The Grace Period setting affects the finance charge calculation by calculating the finance charge from the grace period date rather than the due date. For example, the invoice may show a due date of "Net 15 Days," but a finance change is not applied until 30 days after the invoice date. The finance charge is not applied because the Grace Period option is set to 30 days after invoice date. The Grace Period options are as follows:
-
Set the Monthly Finance Charge Rate that will be charged for any overdue customer invoices. Many companies charge an overdue finance charge rate of 1% to 2% per month. This computes to a total of 12% to 24% annual rates. Review the Printing Customer Statements section for more details on processing finance charges.
-
The Minimum Finance Charge amount is the minimum charge per invoice. If the calculated finance charge for any overdue invoice is less than the Minimum Finance Charge, the finance charge amount will equal the Minimum Charge. (Zero this field if there is no minimum charge amount.)
-
The Delinquency Reason setting can be used to identify customers with poor payment records. The user can enter in any user-defined text as the delinquency reason. This setting will show on the accounts payable aging reports.
-
Enter the customer's Credit Limit. A warning message will be displayed within an invoice if the total receivable plus the invoice total is more than the credit limit. If the customer has unlimited credit, enter zero into the credit limit field. Disable the Charge payment option to not allow any credit.
-
-
The Shipping Information section is used to process shipping charges on sales invoices.
-
The Ship To ID is the ID for the customer being shipped to. This field is copied to the invoice and printed on the Ship To section of the invoice if the merchandise is being shipped. EBMS determines if the merchandise on a specific invoice is being shipped by comparing the Default Shipping Method (FOB) setting with the Ship Via field on the invoice. FOB assumes that the items are being picked up.
-
Enter the standard freight charge, if any, in the Freight Charge field. If no freight is charged for invoices over a certain dollar amount, enter a Minimum Free Freight amount. If the items are being shipped, enter UPS or the shipping company in the Ship Via field on that specific invoice. If a customer always has items shipped, it is most efficient to enter another method in the Shipping Information section in the Sales > Customer > Terms tab (in the Default Shipping Method field). This information will then be copied on each sales order or invoice created for this customer.
-
If the invoice's Ship Via field does not match the Default Shipping Method (FOB) field (the merchandise is being delivered by UPS or some other shipping company), and the invoice total is less than the Minimum Free Freight amount, the Freight Charge amount is copied into the invoice's Freight field. If the customer is picking up the items (the Standard Shipping Method (FOB) field = the Invoice>Ship Via field), no freight charges will be applied to the invoice automatically. A manual freight charge can be entered on the invoice at any time. See the Calculating Freight Charges on Invoices section for more details.
-
-
The Sales Tax Exemption settings should be set if the customer is sales tax exempt. See the Sales Tax section for more details on sales tax processing.
Advanced Tab
Click Advanced to open the following tab:
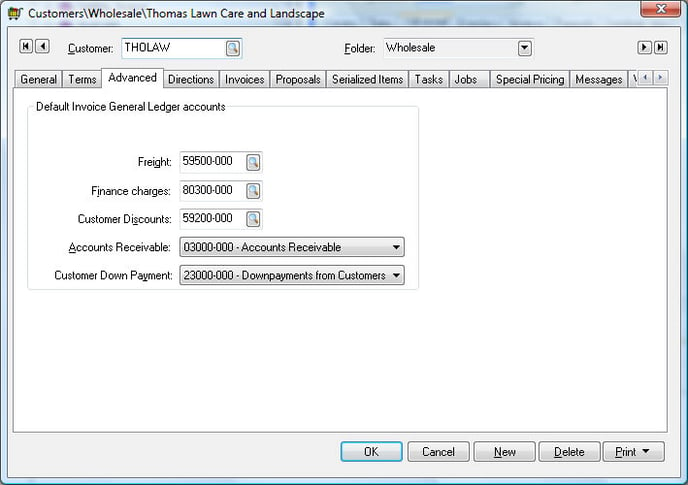
This is where the customer's general ledger account defaults are set up and modified. These accounts are universally set in most situations. To universally set up the advanced tab settings, go to Sales > Options > Customer Categories tab > Edit Defaults button > Advanced tab. Review the Setting Customer Defaults section for details in globally changing the advanced tab general ledger accounts.
Set the Freight general ledger account to the expense account used to record shipping income. All Freight charges entered on the sales invoice footer will be posted to this account.
Review Accounts Receivable Transactions for details on the Accounts Receivable account.
Set the remaining general ledger accounts to the appropriate accounts. It is recommended that these accounts be set as defaults in Sales > Options > Customer Categories tab > Edit Defaults > Advanced tab. See the Setting Customer Defaults section for more details.
Invoices Tab
The information within the Invoices tab on the customer record lists sales orders and invoices by status as customer invoices are processed. Select the Billed to this Customer or Shipped to this Customer option to query based on these accounts. Click on individual columns to sort and search by Invoice Date, Invoice number, Status, and P.O. Number. Click on the New Invoice button to create a new sales order or invoice from this tab.
Proceed with the Customer History section for more details on these tabs.
Proposals Tab
The information in the Proposals tab lists quotes and proposals by status or by bill to or ship to account. Click on individual columns to sort and search by Date or Proposal number. Click on the New Proposal button to create a new quote or proposal from this tab.
Messages Tab
For details on inserting and editing messages, review the Custom Messages section of the main documentation..
Website Tab
Review the Configuring the Configuring the Shopping Cart > Customer Accounts section of the e-commerce documentation for more details on creating and managing the website login information for e-commerce customers.
Map Tab
Review the Mapping section for more details on the mapping tools on this tab.