Change Invoice Customer | Sales Invoice Fields | Entering Detail Lines | Invoice Actions
Sales invoices are sales orders that have been processed. If a sales order exists for the invoice that you wish to process, locate the sales order (review the Viewing Sales Orders section for more details), make the appropriate changes described below, and then process the sales order to create a new sales invoice.
(The invoice window has its own header menu that is used within the invoice and will be referred to as the invoice menu throughout this section.)
Invoice detail can be entered so that it is shown or hidden on the printed invoice. Review the Materials List for more details on how to enter invoice detail but not show it on the printed invoice.
Go to , and a Sales Invoice Entry window will appear. (Note that this same window is used to enter sales orders.)
Type the customer ID in the Customer ID field or select one from the selection window. Complete the following steps to change the Customer ID from another customer.
-
-
Select from the invoice menu to open the following dialog:
-
Enter the new Customer ID into the New Customer entry or click New to create a new customer record.
-
Set the desired optional processes that change invoice data such as Recalculate prices, Change terms and freight charge..., or Change billing and shipping customer addresses.
-
Click Finish to change the Customer ID within the sales invoice to a new customer ID. Press the tab key to move from the Customer ID entry to the invoice field if no sales orders exist. If sales orders do exist for the current customer, the following dialog will appear:
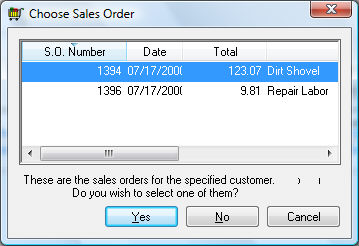
Highlight the sales order to edit or process and click Yes button. To enter a new sales order or invoice, click No.
-
How to fill in fields for the sales invoice:
Tab through the Invoice field to auto-generate the sales order number.
Enter the Ship To customer ID if the products are being shipped. To manually edit the Ship To name and address, blank the Ship To ID and press tab on your keyboard. The Ship To field defaults to the ID specified in the . Note that the shipping address will not be printed on the invoice unless the Ship Via field is changed. The Ship To entry determines the sales tax rate if the item is being shipped. Review the Sales Tax Overview and the Calculating and Comparing Freight Charges for more details.
The invoice Date will default to the current date each time a sales order is opened, or a new invoice is being entered. This date, along with the invoice terms, measure the invoice age. Review Invoice and Sales Order Aging for more details on the aging report.
A Shipping tab may appear in the upper right corner of the sales order. This tab contains various shipping options and shipping details. Review Calculating and Comparing Freight Charges.
The Contacts tab is used to select customer contacts for this order. Review Contact Management to add or edit contact information.
A Serial No. tab may appear to attach an equipment serial number or a vehicle VIN number. Review Attaching a Vehicle to a Sales Invoice for more details on attaching equipment or vehicles to a sales order.
Select the Payment method and enter any term information. Review the Payment Methods and Terms section for details for each payment method or charge terms.
The Sales Person field should reflect the salesperson who entered and processed the invoice. This entry can be used to process commissions. Review the Salesperson Commissions documentation for more details. To default this field to the user name used in the EBMS Login process, go to Sales > Options > Invoices and S.O.s. tab and in the User Preferences section, turn the Default sales person to user name switch on.
Enter the customer's P.O. (Purchase Order) for this invoice. If Job Costing is installed, this field may be called P.O./Job. Keep the field blank if no purchase order is used.
Enter the Ship Date when the invoice products were shipped. Ignore this field if the customer picked up the invoice items or the service was rendered in-house.
The Ship Via field is used to specify the method of shipment and defaults to the pickup code recorded in customer account record's tab for Shipping Method. If this code is changed to anything besides the default setting, the sales order will print the Ship To name and address on the printed invoice and automatically calculate Freight charges.
The Freight Charge will be calculated only if the total of the sales order is below the Minimum Free Freight amount entered in tab. To view the Freight charge amount, go to field, which is copied from the tab when a sales order or invoice is created. If the freight charge is manually changed on the invoice, the Freight Charge amount will be zeroed in Advanced Options and the Freight amount will no longer be calculated automatically.
The Price Level field defaults to the price level specified for the customer entered in customer account record's tab > Price Level field. This setting is used to set the appropriate inventory pricing on the sales invoice. Look at a product record's Pricing tab to view or set the different sale prices for individual inventory items. To permanently change the Price Level setting for a customer, go to tab on the customer account record.
How to enter details lines for a sales invoice:
Enter the invoice detail lines, using as many lines as needed. Note: To remove a column from the invoice table view, right-click on the column header to view a list of all available columns and uncheck any column name to hide. Only checked columns will be visible in the table.
-
-
Enter the item quantity the customer Ordered. The Ordered quantity is recorded in the Count tab of the inventory item if an inventory item is entered.
-
The Shipped field should reflect the item amount that the customer received. The invoice total will be calculated by this quantity. If the Shipped amount is less than the Ordered amount and the option to create backorders is on, a new sales order will be created for the balance amount that has not been shipped. To set the backorder option, go to Sales > Options > Invoices and S.O.s tab and enable the Create backorders automatically when processing a sales orders option. The amount ordered on the backorder would be the total amount ordered minus the amount shipped to date. (Ordered - Shipped = Backorder Amount)
-
Enter the Product (inventory item) ID code. The Description, Cost, Taxable switch and G/L Account will automatically be filled in from the information entered in the product records. Alternative codes such as a lot number, serial number, UPC codes, and Manufacturer Part Number can be entered into this column.
Products that are not included in the product catalog can be accessed from the vendor catalog. Review Creating Inventory Items from a Vendor Catalog for instructions to conveniently insert an item into the catalog and the invoice. Use Ctrl + J to view sales history.
An item can also be added by scanning a barcode. Review Entering Barcodes for instructions to pre-configure barcodes or to create a product by scanning a new barcode.
-
The Unit of Measure (UOM) field is an optional field that identifies the unit of measure being used for this inventory item. Review the Unit of Measure section of the inventory documentation for more details. If multiple units of measure are never used for any inventory items, ignore this field.
-
The Unit Weight field is an optional field that can be set for each inventory item in the product record's General tab > Gross Weight field. Ignore this field if weights are not used.
-
Weight equals the total weight for this line in the invoice. It equals the Shipped column amount times the Unit Weight. Review the Calculating Total Weight section for more details.
-
The Description field describes the item being sold and will be printed on the sales invoice. If the item doesn't have an inventory code, leave the Product field blank and manually type a Description of the item being sold. To type more than one description line on the invoice, leave Ordered, Shipped, and Item fields blank on the following lines and type the notes in the description column.
Rather than typing in a description line each time you invoice for a specific service or non-inventory item, create a new "inventory item" and set the inventory Classification to Service. View an inventory item's Classification setting on the General tab of the product record. (See Service Codes for more details on how to use the inventory system to save data entry time when entering sales invoices.)
-
The Internal Note is for internal use only and should not be shared with customers, vendors, or other outside individuals. Review Notes and Instructions for instructions on using the internal note field as well as product notes and descriptions.
-
Enter the sale Price of the item. Note that when you enter an inventory item, a price is copied from the inventory record based on the price level, but the price can be changed at any time before the invoice is processed. This Price amount is used to calculate the extended amount and the invoice total. (Shipped * Price = Amount)
-
The Amount field will automatically be calculated from the Quantity Shipped entry and the Price. Review Limit Over-Assignment to limit quantity shipped to the amount ordered.
-
If the Taxed column is checked, sales tax will be calculated using the Tax Table setting specified at the bottom of the sales order. If the Tax Table is set to EXEMPT, the Taxed check mark will have no effect on the Tax amount and can be ignored.
-
Enter the correct revenue G/L Account. This field automatically defaults to the general ledger code that is set up in the product record's Advanced tab. This code can be changed manually for a specific invoice.
-
The Cost amount will equal the total perpetual cost if a track count inventory item was entered, and the Inventory Method was set to Perpetual. Go to Inventory > Options > General tab to set the Inventory Method. (If the Inventory Method is set to Periodic, it is recommended that the cost column be hidden.) Right-click on the Cost column heading and uncheck Cost to hide the column. The profit of a detail can be calculated by subtracting the cost from the extended price.
-
Repeat the steps listed above for each invoice detail line.
-
Sales Invoice Totals and Defaults
Sales Taxes: The sales tax table is used when calculating the sales tax amount. Sales tax information is displayed in the lower left-hand corner of the sales invoice window. Go to View > Sales Taxes in the invoice menu to change the sales tax table settings. This entry will display Multiple if multiple sales tax settings are applicable.
The sales tax is automatically calculated based on the Taxable total (all detail lines that have the Taxed column checked) and the Tax Table setting. The sales tax amount can be manually altered within the View > Sales Tax dialog in the invoice menu. Review the Changing the Sales Tax Rate Within a Sales Invoice section for more details. The only reason to manually change the Tax amount is if the tax has manually been calculated on a handwritten invoice, and the tax was rounded to a slightly different tax amount.
NOTE: The discount will be deducted from the total when calculating sales tax. Taxable sales = taxable sales discount. If the Payment method is set to charge, the taxable sales = total taxable sales and the discount is ignored.
Freight, Shipping, and Handling: Enter any freight charges that need to be added to the invoice. This charge is automatically calculated if the Ship Via entry does not equal the Standard Shipping Method (FOB) within the Terms tab on the customer account record. Look at the estimated shipping and handling field at the bottom of the window, which is called Est. S&H on the invoice. The standard FOB setting for shipping is the default in EBMS. The FOB (Free On Board) shipping setting assumes that the customer will pick up the order or the service was already rendered. The Ship Via field can be changed on any sales invoice.
If a customer always gets items shipped, it may be helpful to change the Standard Shipping Method (found in the Terms tab on their customer account record) to UPS or something similar. See Calculating and Comparing Freight Charges for more details.
The Freight Charge will be calculated only if the total of the invoice is below the Minimum Free Freight amount set in the Terms tab of the . To view the Freight charge amount, go to field in the invoice menu that is copied from the tab in the customer account record when a sales order is created. If the freight charge is changed on the invoice, the Freight Charge amount will be zeroed in Advanced Options so the Freight amount will no longer be calculated automatically.
Finance Charges and Discounts: Enter a cash Discount amount for the invoice if the invoice is paid within terms. A discount will automatically be calculated if the invoice discount terms are set. Note that if you manually enter a discount amount in the Discount field at the bottom of the page, any default discount terms on the invoice will be erased. Discounts can be calculated for all or part of the invoice using the percentage discounts inventory classification. Review the Discounts section from the Inventory documentation for more details.
The Finance Charge (Finance Chg) amount is automatically updated when customer finance charges are updated on overdue invoices, but it can be changed at any time before the invoice is paid in full. This value can also be changed in the window. Review Customer Finance Charges for more details.
Sales Invoice Actions
Add a note: To add or edit an invoice note or memo, go to the invoice menu option . This memo can also be seen on the upper right corner of the invoice window if the screen size is large enough.
Edit Settings: To view or edit advanced invoice settings, select invoice menu option and the following window will appear: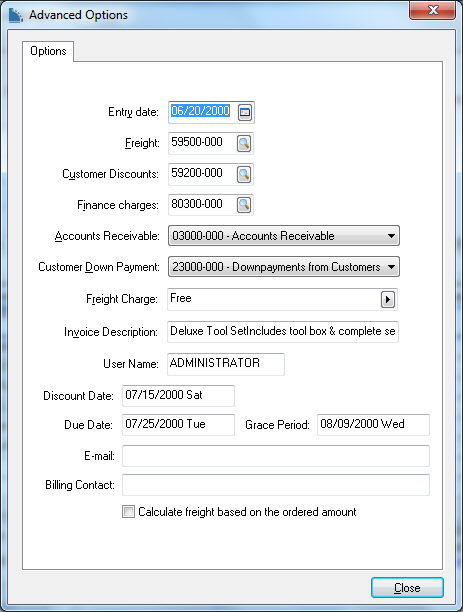
- The Freight, Finance Charges, Customer Discounts, Accounts Receivable, and Customer Down Payment fields are general ledger accounts that are copied from the customer's Advanced tab. These codes normally will not need to be changed.
- The Freight Charge is copied from the tab and is used to calculate freight charges automatically. This field is blanked if the Freight amount is changed on the invoice foster.
- The Due Date and Discount Date are calculated from the terms field. These dates cannot be changed without changing terms. Click OK to save advanced options and return to the invoice window.
Process and Print: To process and print the invoice, go to from the invoice menu or press Ctrl + P on the keyboard. A copy of the invoice will print. Review the Printing a Sales Invoice or Payment Receipt section for more details on configure the invoice form.
- If no invoice is to be printed, go to or press Ctrl + R on the keyboard.
- To print an invoice or sales order without processing it, select invoice menu and select the appropriate report.
- If the invoice payment type is Charge or COD, the invoice will appear in the window. If the invoice was set as cash, no additional processing is needed for this invoice.
Create a new invoice: To enter another sales invoice, select from the invoice menu or press Ctrl + N on the keyboard and the system will prompt you to save the invoice.
Use recurring billing to make an invoice: A sales order or invoice can be created using a recurring billing proposal using the optional Recurring Billing module. Review Recurring Billing Overview for more details on this feature.
View invoices by product: Review the Product Sales Activity section of the inventory documentation for details on how to get a list of invoices that contain a specific inventory item.